Retouching Pictures (Edit)
Create retouched copies of pictures. In the case of RAW pictures, you can adjust the settings in effect at the time the picture was taken, such as white balance and picture mode (art filters included). With JPEG pictures, you can make simple edits such as cropping and resizing.
| RAW Data Edit | Retouch pictures and save the resulting copies in JPEG format (“Retouching RAW Pictures (RAW Data Edit)”). The following options are available: [Current]: Save the picture at the settings currently selected with the camera. [Custom1]/[Custom2]: Adjust settings while previewing the results in the display. The settings are saved as [Custom1] or [Custom2]. [ART BKT]: The camera creates multiple JPEG copies of each image, one for each art filter selected. Select one or more filters and apply them to one or more images. |
|---|---|
| JPEG Edit | Retouch JPEG pictures and save the resulting copies in JPEG format (“Retouching JPEG Pictures (JPEG Edit)”). |
Retouching RAW Pictures (RAW Data Edit)
[RAW Data Edit] can be used to adjust the following settings.
- Image quality
- Picture mode
- Color/saturation (Color Creator)
- Color (Partial Color)
- White balance
- Color temperature
- Exposure compensation
- Shadows
- Mid-tones
- Highlights
- Aspect
- High ISO noise reduction
- Color space
- Keystone compensation
- [Color Space] is fixed at [sRGB] when an art filter is selected for picture mode.
RAW pictures cannot be retouched if:
- there is not enough space on the memory card or if the picture was created with a different camera
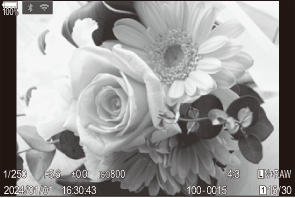
Display an image you want to edit and press the OK button.
- The playback direct menu will be displayed.
Highlight [RAW Data Edit] using FG and press the OK button.
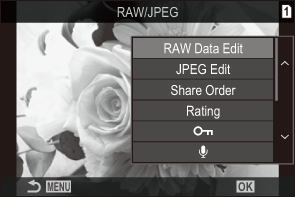
- The editing menu will be displayed.
Highlight items using FG.
To apply current camera settings, highlight [Current] and press the OK button. Current settings will be applied.
- For exposure compensation, the current settings will not be applied.
- Highlight [Yes] using FG and press the OK button to create a copy using the selected settings.
For [Custom1] or [Custom2], highlight the desired option and press I, then edit settings as follows:
- Retouch options will be displayed. Highlight items using FG and use HI to choose settings. Repeat until all the desired settings have been chosen. Press the R button to preview the results.

- Press the OK button to confirm the settings. The processing will be applied to the image.
- Highlight [Yes] using FG and press the OK button to create a copy using the selected settings.
Highlighting [ART BKT] and pressing I displays a list of art filters. Highlight art filters and press the OK button to select or deselect; selected filters are marked with a P. Press the MENU button to return to the previous display once all the desired filters have been selected.
- Press the OK button to record the image after processing with the selected art filter.
To create additional copies from the same original, highlight [Reset] and press the OK button. To exit without creating more copies, highlight [No] and press the OK button.
- Selecting [Reset] displays editing options. Repeat the process from Step 3.
Retouching JPEG Pictures (JPEG Edit)
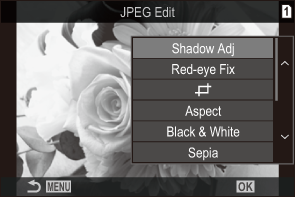
[JPEG Edit] can be used to adjust the following settings.
| Shadow Adj | Brighten back-lit subjects. |
|---|---|
| Red-eye Fix | Reduce “red-eye” in pictures taken with a flash. |
| M | Crop pictures. Size the crop with the front or rear dial and position it with FGHI. |
| Aspect | Change the aspect ratio from the standard 4:3 to [3:2], [16:9], [1:1], or [3:4]. After choosing an aspect ratio, use FGHI to position the crop. |
| Black & White | Create a black-and-white copy of the current picture. |
| Sepia | Create a sepia copy of the current picture. |
| Saturation | Adjust the vividness of colors. The results can be previewed in the display. |
| L | Create a resized copy 1280 × 960, 640 × 480, or 320 × 240 pixels in size. Pictures with an aspect ratio other than the standard 4:3 are resized to dimensions as close as possible to the selected option. |
- Red-eye correction may not work depending on the image.
JPEG pictures cannot be retouched if:
- the image is processed on a PC, if there is not enough space in the memory card, or if an image is recorded on another camera.
- Images cannot be made larger than the original size using [L].
- Some images can not be resized.
- [M] and [Aspect] can only be used to edit images with an aspect ratio of 4:3 (standard).
Display an image you want to edit and press the OK button.

- The playback direct menu will be displayed.
Highlight [JPEG Edit] using FG and press the OK button.
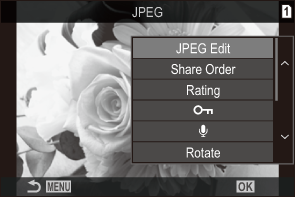
- The editing menu will be displayed.
Highlight an option using FG and press the OK button.
The effect can be previewed in the display. If multiple options are listed for the selected item, use FG to choose the desired option.
When [M] is selected, you can size the crop using the dials and position it using FGHI.
When [Aspect] is selected, you can select an option using FG, and then position the crop using FGHI.
Highlight [Yes] using FG and press the OK button.
- The new copy will be saved at the selected settings and the camera will return to the playback display.