Shooting scenes with high contrast (Live GND Shooting)

The camera combines a series of exposures to create a single photo. This will increase the amount of detail visible in the highlights and shadows of high-contrast scenes, such as landscapes. Adjust the level of the effect while looking at the screen.
Enabling Live GND Shooting
Menu
- MENU U b U 1. Computational Modes U Live GND Shooting
Use FG to select [Live GND Shooting] and press the OK button.
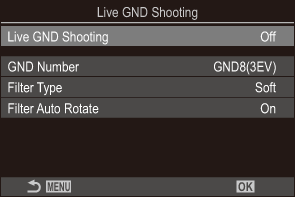
Live GND Shooting setting screen
Highlight [On] using the FG buttons and press the OK button.
Off Pictures are taken without live GND shooting. On Pictures are taken with live GND shooting. - The display returns to the Live GND Shooting setting screen.
Configuring Live GND Shooting
Configure options.
- Press FG to select an item and press the OK button to display the setting menu.
- After configuring options, press the OK button to return to Live GND Shooting setting screen.
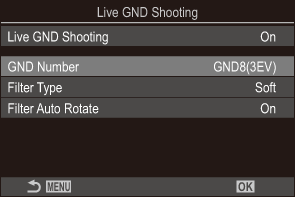
GND Number Darkens (dims) a portion of the screen by the configured amount.
[GND2(1EV)], [GND4(2EV)], [GND8(3EV)]
Filter Type Configures the range of the gradation for the boundaries between the areas to which the effect will be applied (darkened areas) and the areas to which it will not be applied (areas with unchanged brightness).
[Soft], [Medium], [Hard]
[Soft] produces a wider gradation than [Medium] and can blur the boundaries between light and dark areas.
[Hard] produces a gradation that is narrower than [Medium] and makes the boundaries between light and dark areas clear.
Filter Auto Rotate Choose whether to rotate the angle of the gradation boundary according to the landscape/portrait orientation of the camera.
[On]: The angle of the gradation boundary changes automatically when the orientation of the camera is changed.
[Off]: The angle of the gradation boundary does not change when the orientation of the camera is changed.
Shooting
Press the MENU button to close the Live GND Shooting setting screen and return to shooting screen.
- The selected GND number, filter type, and T indicating the side to which the effect is applied appear in the display.
- The black side of the T icon is the side to which the effect is applied (the dimmed side).

- Boundary
Adjust the angle and position of the boundary while previewing the results in the display.
- Adjust the boundary angle using the front and rear dials. The front dial adjusts the angle in increments of 15°, the rear dial in increments of 1°.
- Adjust the boundary position using the arrow pad.
- To reset the angle and position of the boundary, press and hold the OK button.
The fastest shutter speed available varies with the GND filter selected.
[GND2(1EV)]: 1/16000 s
[GND4(2EV)]: 1/8000 s
[GND8(3EV)]: 1/4000 s
- [Image Aspect] and [Digital Tele-converter] settings are not applied to the live view in the screen for adjusting the boundary (However, they are applied to the saved image).
- When an option other than [4:3] is selected for [Image Aspect] or [On] is selected for [Digital Tele-converter], a frame will appear on the screen to indicate the area that will be shown in the shot image.
To adjust aperture, shutter speed, and other shooting settings, press the INFO button.
- The camera will return to the standard shooting display.
- To return to the live GND shooting settings shown in Step 1, press the INFO button repeatedly.
Release the shutter.
- To end live GND photography, select [Off] in the [Live GND Shooting] display.
- When shooting immediately after the shooting display appears or while zoomed in, images may not be captured with the optimal exposure. Preview the results in the display before shooting.
- “Noise” in the form of lines may appear with a composition where a strong light source is taken in the picture.
- The upper limit for [KISO] during live GND photography is ISO 3200. The upper limit is ISO 1600 when [Auto] is selected for [KISO].
The following cannot be used:
- Flash photography, HDR, High Res Shot, multiple exposure, keystone compensation, bracketing, focus stacking, interval-timer photography, K flicker scan, flickerless photography, fisheye correction, live ND shooting, subject detection
- When Live GND Shooting is enabled, [Drive] is set to [A] (Silent Single). [q12s] (Silent self-timer 12s), [q2s] (Silent self-timer 2s) and [qC] (Silent custom self-timer) can be set.
- Pictures taken with [i-Enhance] or an art filter selected for picture mode are recorded in [Natural] mode.
- The camera automatically selects [S-AF] for AF mode (“Choosing a focus mode (KAF Mode / nAF Mode)) in place of [C-AF] and [C-AF+TR], and [S-AFJ] in place of [C-AFJ] and [C-AF+TRJ].
- [KLV Mode] is set to [Standard], and [KNight Vision] is set to [Off].