Adjusting Wi-Fi Settings (Wi-Fi Connection)
Adjust settings for connection to the network to which the paired computer belongs.
Before the camera can connect to the computer via Wi-Fi, it must be configured for connection to the network via the Wi-Fi router or access point. Multiple network profiles can be stored on the camera and recalled as desired. [Wi-Fi Connection] settings can be adjusted via the following methods:
| Connect by WPS | Configure the camera for automatic connection (Connecting via WPS (Connect by WPS)). To connect using a WPS router or access point, simply press the device’s WPS button. [PBC Method]: Connect using only the router WPS button. The camera connects automatically when the button is pressed. [PIN Method]: The camera connects in PIN mode. Enter the camera PIN on the router to connect. |
|---|---|
| Connect from z List | Choose the network from a list (“Choosing a Network from a List (Connect from z List)”). The camera will search for available networks; to connect, select a network from the list and enter the network password. |
| Connect manually | Adjust connection settings manually (“Connecting Manually (Connect manually)”). To connect, enter the network name (SSID) and other settings. |
- WPS connections require a WPS-compatible router or access point.
- Connecting via WPS in PIN mode requires that the router itself be connected to an administrator computer from which the PIN can be entered.
- Manual connection requires that you have information on the network to which you are connecting.
The camera can connect via routers or access points of the following types:
- Standard: IEEE802.11a/b/g/n/ac
- Band: 2.4 GHz or 5 GHz
- Security: WPA2, WPA3
- The camera can store settings for up to eight networks. The camera will automatically connect to networks to which it has previously connected.
- Each new connection after the eighth overwrites settings for the connection that has been left unused for the longest period of time.
- Adding a network profile for an access point with the same MAC address as existing profile overwrites the settings for the existing profile.
- For information on using routers or access points, see the documentation provided with the device.
- Network profiles are not reset when you select [Initialize All Settings] for [Reset/Initialize Settings]. To reset network settings, use [Wi-Fi PC Settings] > [Reset Wi-Fi PC Settings].
Enabling Camera Wi-Fi
Before connecting to a network via Wi-Fi, you will need to enable Wi-Fi on the camera. If [Airplane Mode] is set to [On], set it to [Off].
Connecting via WPS (Connect by WPS)
Connect using the WPS feature on the router or access point.
Menu
- MENU U e U 4. Wi-Fi/Bluetooth U Wi-Fi Connection
Highlight [PC Connection] using the FG buttons and press the OK button.
- [PC Connection] options will be displayed.
- Highlight [Connect by WPS] using the FG buttons and press the OK button.
Highlight an option using the FG buttons and press the OK button.
- If you selected [PBC Method], press the WPS button on the router or access point.
- Press the camera OK button to start the connection.
- Some time may be required for connection after the button is pressed.
- If you selected [PIN Method], the camera will display a PIN; enter it on the router or access point. Press the camera OK button when the router is ready to connect.
If the camera is able to connect, the network will be displayed with a check (P) next to the network name.
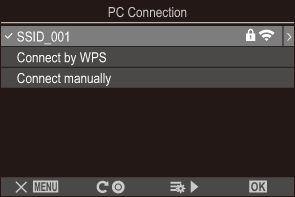
- If the camera has been paired with more than one computer, you will be prompted to choose a computer before the network is displayed. Highlight the desired computer using the FG buttons and press the OK button.
- The camera can be used only with the selected computer. To select a different computer, you must first terminate the current connection.
If the connection fails, the camera will display a message to that effect, followed by the options shown in Step 3. Remove and reinsert the memory card.
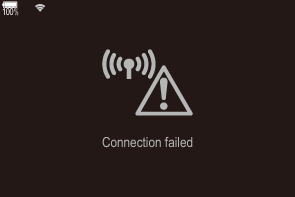
Press the OK button to exit to the shooting display.
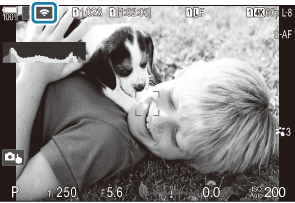
The camera will return to the standard shooting display. A on the screen will turn green.
Connecting Manually (Connect manually)
Adjust network settings manually.
Menu
- MENU U e U 4. Wi-Fi/Bluetooth U Wi-Fi Connection
| SSID | The network name (SSID). |
|---|---|
| Authentication | The type of security used on the network. |
| Password | The password for connection to a secured network. |
| IP Address Assign | Choose whether the camera IP address is assigned automatically by the network DHCP server. |
| IP Address | These fields are required when the IP address is assigned manually. The settings used vary with the network. |
| Subnet Mask | |
| Default Gateway | |
| DNS |
Highlight [PC Connection] using the FG buttons and press the OK button.
- [PC Connection] options will be displayed.
- Highlight [Connect manually] using the FG buttons and press the OK button.
Highlight options using the FG buttons and press the OK button.
- Options for the selected item will be displayed.
SSID Enter the network SSID. Authentication Select the type of security used on the network. Choose from [None], [WPA2/WPA3] and [WPA3]. Password If you selected [WPA2/WPA3] or [WPA3] for [Authentication], enter the network password. IP Address Assign Choose from [Auto(DHCP)] and [Manual]. Automatic IP address assignment requires a network with a DHCP server configured to supply IP addresses automatically. IP Address These fields are required when [Manual] is selected for [IP Address Assign]. Subnet Mask Default Gateway DNS - Highlight [Start Connection] using the FG buttons and press the OK button.
If the camera is able to connect, the network will be displayed with a check (P) next to the network name.
- If the camera has been paired with more than one computer, you will be prompted to choose a computer before the network is displayed. Highlight the desired computer using the FG buttons and press the OK button.
- The camera can be used only with the selected computer. To select a different computer, you must first terminate the current connection.
If the connection fails, the camera will display a message to that effect, followed by the options shown in Step 4. Remove and reinsert the memory card.
Press the OK button to exit to the shooting display.
The camera will return to the standard shooting display. A on the screen will turn green.
Choosing a Network from a List (Connect from z List)
The camera will search for available networks and display them in a list from which you can choose the network to which you wish to connect.
Menu
- MENU U e U 4. Wi-Fi/Bluetooth U Wi-Fi Connection
Highlight [PC Connection] using the FG buttons and press the OK button.
- [PC Connection] options will be displayed.
Highlight [Connect from z List] using the FG buttons and press the OK button.
- A list of available networks will be displayed.
Highlight the desired network using the FG buttons and press the OK button.
- If the network is password-protected, you will be prompted to enter a password. Enter the password and press the OK button.
- Press the I button to display [Detail Settings] for the highlighted network. You can enter an IP address and adjust other settings manually.
- Press the R button to repeat the search and update the network list.
If the camera is able to connect, the network will be displayed with a check (P) next to the network name.
- Password-protected networks are indicated by a 2 icon.
- If the camera has been paired with more than one computer, you will be prompted to choose a computer before the network is displayed. Highlight the desired computer using the FG buttons and press the OK button.
- The camera can be used only with the selected computer. To select a different computer, you must first terminate the current connection.
If the connection fails, the camera will display a message to that effect, followed by the options shown in Step 3. Remove and reinsert the memory card.
Press the OK button to exit to the shooting display.
The camera will return to the standard shooting display. A on the screen will turn green.
Connecting to Previously-Selected Networks
- The camera will automatically reconnect to previously-selected networks when you select [PC Connection] via the J icon. You will not be required to supply a password.
- If multiple networks are available, the camera will connect first to the most recently-used network.
- Once the camera has connected, it will display a list of available networks with the current network shown by a check mark (P).
- To connect to a different network, highlight it in the list and press the OK button.
- If the camera has been paired with more than one computer on the network, you will be prompted to choose a computer before the network list is displayed. Highlight the desired computer using the FG buttons and press the OK button.
Displaying the MAC address / Resetting Wi-Fi settings for PC connection (Wi-Fi PC Settings)
You can display the camera’s MAC address for Wi-Fi connection and reset the Wi-Fi settings used for connection to a computer.
Menu
- MENU U e U 4. Wi-Fi/Bluetooth U Wi-Fi PC Settings
| Wi-Fi MAC Address | Display the camera’s MAC address for Wi-Fi connection. |
|---|---|
| Reset Wi-Fi PC Settings | Delete the information about computers the camera has paired with and access points the camera has connected to. |