Shooting still pictures in a higher resolution (High Res Shot)

Shoot at resolutions higher than that of the image sensor. The camera takes a series of shots while moving the image sensor and combines them to create a single high-resolution photo. Use this option to capture details that normally would not be visible even at high zoom ratios.
When High Res Shot is enabled, the image quality mode for High Res Shot can be selected using [KX] (“Configuring KX”).
Button
- M Button
Menu
- MENU U b U 1. Computational Modes U High Res Shot
Enabling High Res Shot
Use FG to select [High Res Shot] and press the OK button.
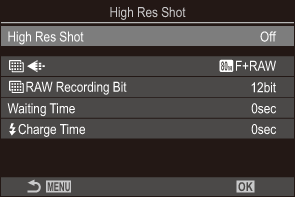
High Res Shot setting screen
Use HI to select [Onv] (tripod) or [Onu] (handheld) and press the OK button.
Off High Res Shot is disabled. Onv
(Tripod)Shoot with the camera fixed to a tripod. The RAW picture is recorded in 80M (10368 × 7776). Onu
(Handheld)Shoot with the camera in your hands. The RAW picture is recorded in 50M (8160 × 6120). - The display returns to the High Res Shot setting screen.
When setting from the button, you can turn this function on and off using the M button.
You can also switch between [Onv] (tripod) and [Onu] (handheld) by rotating the front or rear dial while pressing the M button.
Configuring High Res Shot
Configure options.
- Press FG to select an item and press the OK button to display the setting menu.
- After configuring options, press the OK button to return to High Res Shot setting screen.
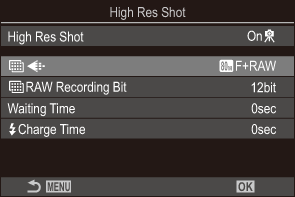
MX Choose the image quality of High Res Shot shooting (“Configuring KX”). MRAW Recording Bit Select the bit depth of RAW images created.
[12bit]/[14bit]
- A [14bit] image will have richer tones, but the file size will be larger and the post-processing time will also be longer than that of a [12bit] image. Choose for pictures that will later be edited on a computer.
Waiting Time Set how long the camera waits before releasing the shutter after you press the shutter button fully. Use this to prevent the effect of camera shake caused by the pressing of the shutter button. ACharge Time Choose how long the camera waits for the flash to charge between shots when using a flash unit not specifically designated for use with the camera.
Shooting
Press the MENU button to close the High Res Shot setting screen and return to shooting screen.
- The M icon will be displayed. The M icon will flash if the camera is not steady. The M icon stops flashing when the camera is steady and ready to shoot.
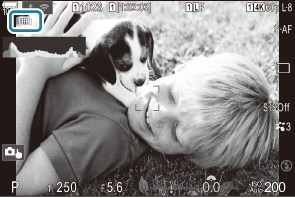
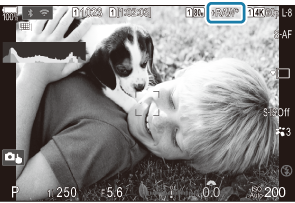
- After enabling High Res Shot, check the option selected for image quality. Image quality can be adjusted in the super control panel.
When [MRAW Recording Bit] is set to [14bit], a mark (*) appears next to “RAW” for image quality.
Release the shutter.
- Shooting is complete when the green M icon clears from the display.
- The camera will automatically create the composite image when shooting is complete. A message will be displayed during this process.
- Choose from JPEG (HF, IF, or JF) and RAW+JPEG modes. When image quality is set to RAW+JPEG, the camera saves a single RAW image (extension “.ORI”) before combining it with the high resolution shooting. Pre-combination RAW images can be played back using the latest version of OM Workspace.
- HF and HF+RAW are unavailable when [Onu] (handheld) is selected as the shooting method.
- [S-IS Off] is automatically selected for [KImage Stabilizer] when [Onv] (tripod) is chosen, [S-IS Auto] when [Onu] (handheld) is selected.
- The maximum wait time for [Onu] (handheld) is 1 second.
- During RC flash photography, the maximum flash wait time is 4 seconds and the flash control mode is fixed at [Manual].
The following cannot be used:
- multiple exposure, keystone compensation, bracketing, focus stacking, fisheye correction, and HDR, anti-flicker shooting, live ND shooting, live GND shooting
- When [High Res Shot] is set to [Onv] (tripod), [Time Lapse Movie] becomes [Off].
- When High Res Shot is enabled, [Drive] is set to [A] (Silent Single). [q12s] (Silent self-timer 12s), [q2s] (Silent self-timer 2s) and [qC] (Silent custom self-timer) can be set.
- Pictures taken with an art filter selected for picture mode will be recorded in [Natural] mode.
- Image quality may drop under flickering light sources such as fluorescent or LED lamps.
- If the camera is unable to record a composite image due to blur or other factors, and if [JPEG] is selected for image quality, the first shot will be recorded in JPEG format. If [RAW+JPEG] is selected, the camera will record two copies of the first shot, one in RAW (.ORF) and the other in JPEG format.