Shooting automatically with a fixed interval (Interval Shooting)

You can set the camera to shoot automatically with a set time lapse. The shot frames can also be recorded as a single movie.
Menu
- MENU U b U 2. Other Shooting Functions U Interval Shooting
Enabling Interval Shooting
Use FG to select [Interval Shooting] and press the OK button.
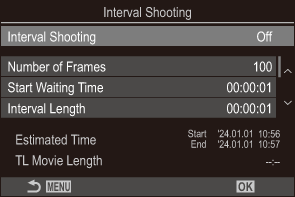
Interval Shooting setting screen
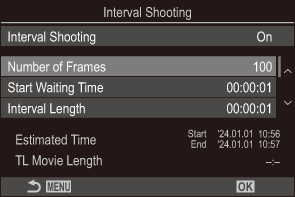
Highlight [On] using the FG buttons and press the OK button.
Off Pictures are taken without using this function. On Pictures are taken at specified intervals. - The display returns to the Interval Shooting setting screen.
Configuring Interval Shooting
Configure options.
- Press FG to select an item and press the OK button to display the setting menu.
- After configuring options, press the OK button to return to Interval Shooting setting screen.
Number of Frames Choose the number of frames shot.
[002] – [9999]
Start Waiting Time Choose how long the camera waits before starting interval timer photography and taking the first shot.
[00:00:00] – [24:00:00]
Interval Length Choose how long the camera waits between shots once shooting has begun.
[00:00:01] – [24:00:00]
Interval Mode Choose whether to put priority on the interval time or the number of frames.
[Time Priority]/[Frames Priority]
If [Time Priority] is selected, the previous shooting may be still in progress even when it is time to shoot the next shot.
When the selected [Interval Length] is short or when using long exposure, the number of recorded frames may be smaller than the number selected for [Number of Frames].
Exposure Smoothing Choose whether to smooth the exposure settings for all frames. The change of exposure will be smooth in the time lapse movie.
[Off]/[On]
Time Lapse Movie Choose whether to record a time-lapse movie.
[Off]: The camera saves the individual shots but does not use them to create a time-lapse movie.
[On]: The camera records the individual shots and also uses them to create a time-lapse movie.
Movie Settings Choose the frame size ([Movie Resolution]) and frame rate ([Frame Rate]) for movies created using [Time Lapse Movie].
The options available for [Movie Resolution] are:
[4K], [FullHD], [HD]
Choose the [Frame Rate] from the following options.
[30fps], [15fps], [10fps], [5fps]
- [Start Waiting Time], [Interval Length] and [Estimated Time] may change depending on shooting settings. Use these as guidelines only.
Shooting
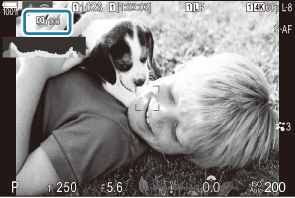
Press the MENU button to close the Interval Shooting setting screen and return to shooting screen.
- An P icon and the selected number of frames appear on the shooting screen.
Release the shutter.
- The specified number of frames will be shot automatically.
- The P icon will turn green and the number of shots remaining will be displayed.
Time lapse shooting will be canceled if any of the following is operated:
Mode dial, MENU button, q button, lens release button, or connection to a computer using a USB cable.
- Turning the camera off ends interval-timer photography.
- Frames are shot even if the image is not in focus after AF. If you wish to fix the focus position, shoot in MF.
- [Image Review] is fixed at 0.5 seconds.
- If the time until shooting or the shooting interval is 1 minute 31 seconds or longer, the monitor will go dark and the camera will enter sleep mode if no operations are performed for 1 minute. The display will turn on automatically 10 seconds before shooting for the next interval begins. It can also be reactivated by pressing the shutter button at any time.
- The camera automatically selects [S-AF] for AF mode (“Choosing a focus mode (KAF Mode / nAF Mode)) in place of [C-AF] and [C-AF+TR], and [S-AFJ] in place of [C-AFJ] and [C-AF+TRJ].
- When [RAF] is selected as the AF mode (“Choosing a focus mode (KAF Mode / nAF Mode)”), focus to initiate shooting, then lock focus and start recording.
- Touch operations are disabled during time lapse shooting.
- Time-lapse shooting cannot be combined with HDR, bracketing, focus stacking, multiple exposure, live ND shooting, or live GND shooting.
- The flash will not work if the flash charging time is longer than the interval between shots.
- When 1000 or a larger number is selected for [Number of Frames], [Time Lapse Movie] will be set to [Off].
- When [High Res Shot] is set to [Onv] (tripod), [Time Lapse Movie] becomes [Off].
- If any of the still pictures are not recorded correctly, the time lapse movie will not be generated.
- If there is insufficient space on the card, the time lapse movie will not be recorded.
- If there is not enough charge left on the battery, the shooting may end partway through. Use a sufficiently charged battery or connect the USB-AC adapter (“Unpacking the box contents”) or a mobile battery conforming to the USB-PD standard to the camera when shooting.