Viewing Pictures on a TV (HDMI)
Photos and movies can be viewed on a high-definition TV connected directly to the camera by means of an HDMI cable. A remote control can be used to operate the display while it is connected to the camera.
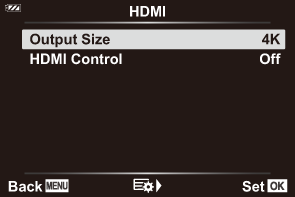
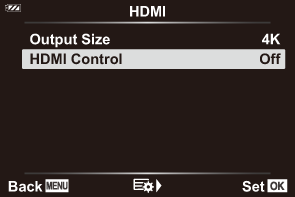
HDMI Output
Choose the signal output to the HDMI device. You can adjust movie frame size and frame rate to match TV specifications and the video standards supported in your country or region. Match output settings to the input settings on the TV.
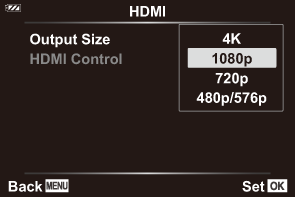
| Output Size | The format for the video signal output via the HDMI connector can be chosen from the options below. [4K]: 4K (3840 × 2160) priority [1080p]: Full High Definition (1080p) priority [720p]: High Definition (720p) priority [480p/576p]: 480p/576p |
|---|---|
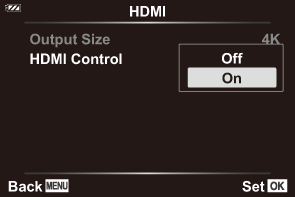
| HDMI Control | The television remote control can be used to operate the camera in playback mode (“Operating the camera using a TV remote control”). Choose from [Off] and [On]. When [On] is selected, the camera can be used for playback only. |
- [HDMI Control] settings cannot be changed while the camera is connected to another device via HDMI.
- Audio can be output only on devices that support the audio format selected with the camera.
- The options available via [HDMI Control] vary with the device connected. See the device manual for details.
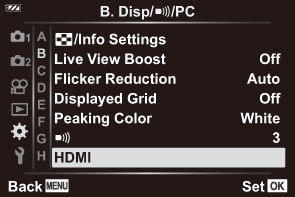
- Press the MENU button to view the menus.
Display C Custom Menu B (Disp/o/PC).
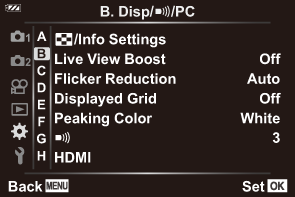
Highlight [HDMI] using the FG buttons and press the I button.
Highlight an item using the FG buttons and press the I button.
Highlight the desired option using the FG buttons and press the OK button.
- Repeat Steps 4 and 5 as required.
- Press the MENU button repeatedly to exit the menu.
Connecting the Camera to a TV
Connect the camera using an HDMI cable.
After confirming that the camera is off, connect it to the TV using an HDMI cable.
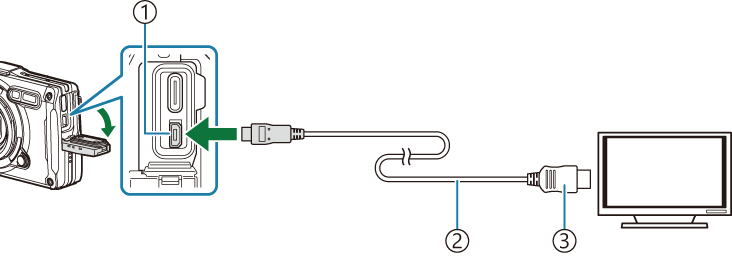
- HDMI connector (Type-D)
- HDMI cable
- Type A
Switch the TV to HDMI input and turn the camera on.
- The TV will show the content of the camera monitor. Press the q button to view pictures.
- If [On] is selected for [HDMI Control], the camera monitor will turn off when an HDMI cable is connected.
- For information on switching to HDMI input, see the manual provided with the TV.
- Depending on TV settings, the image may be cropped and some indicators may not be visible.
- HDMI cannot be used while the camera is connected to a computer via USB.
- The output format used when [4K] is selected in photo mode is 1080p priority.
Operating the camera using a TV remote control
A remote control can be used to operate the display while the camera is directly connected to the TV using an HDMI cable.
- The TV must support HDMI Control. See the device manual for details.
| On | The television remote control can be used to operate the camera in playback mode. When [On] is selected, the camera can be used for playback only. |
|---|---|
| Off | The television remote control cannot be used to operate the camera. Information will only be displayed on the TV screen. |
- Press the MENU button to view the menus.
Select [HDMI] in C Custom Menu B (Disp/o/PC), then press the I button.
Highlight [HDMI Control] using the FG buttons and press the I button.
Highlight [On] using the FG buttons and press the OK button.
- Press the MENU button repeatedly to exit the menu.
Connect the camera to the TV using an HDMI cable.
- Use the TV remote control for operation. You can operate the camera by following the operation guide displayed on the TV.
- During single-frame playback, you can display or hide the information display by pressing the “Red” button, and display or hide the index display by pressing the “Green” button.
- Some televisions may not support all features.
- The camera monitor turns off while the content is displayed on the TV.