Using flash (flash photography)
You can use flash when shooting.
Press the A button (I).
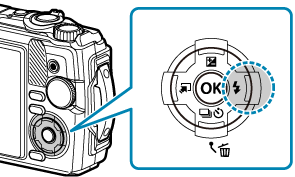
Highlight a flash mode using HI or the control dial and press the OK button.
AUTO Flash Auto The flash fires automatically in dim or backlit conditions. A Fill In The flash fires regardless of lighting conditions.
e Red-eye The flash fires to reduce the red-eye phenomenon. B Flash Off The flash does not fire. f Slow Synchronization + Red-eye Slow synchronization is combined with red-eye reduction flash. g Slow Synchronization (1st Curtain) The flash fires with slow shutter speeds to brighten dimly-lit backgrounds. h, i, etc. Manual Value Control flash output manually. If you highlight [Manual Value] and press the INFO button before pressing the OK button, you can adjust flash output using FGHI or the control dial. j Remote Control The dedicated underwater flash or wireless RC flash is used to take pictures. For details, refer to “Taking pictures with the Wireless RC Flash System”. k LED On The LED illuminator turns on when a picture is taken. This is effective for taking close up pictures.
- When using [e] (Red-eye), it takes about 1 second for the shutter to release following the initial pre-flashes. Do not move the camera until shooting is complete.
- [e] (Red-eye) may not work effectively under some shooting conditions.
- The shutter speed becomes slower in [g] (Slow Synchronization (1st Curtain)). Use a tripod to secure the camera in place.
- Some features may be unavailable depending on the shooting mode and camera settings. g ”List of configurable shooting modes”