Using Separately Sold Accessories
Attaching optional silicone jackets
Attach the jacket as shown. Reverse the steps to remove the jacket.
- Do not use excessive force. Failure to observe this precaution could damage the jacket.

Precautions for using silicone jackets
- Be careful not to let any foreign matter such as dust or sand enter the space between this product and the camera, as this can result in scratches.
- If the silicone jacket gets dirty, wash it with water and allow it to dry completely before use.
- Due to the non-slip property of silicone, the camera does not fit easily into a camera case when the silicone jacket is on.
Taking pictures with the Wireless RC Flash System
You can take pictures and underwater pictures with a wireless flash when using a flash compatible with the Wireless RC Flash System.
The setup range for wireless flash shooting varies depending on the environment, but the standard range is 1 to 2 m from the camera's built-in flash.
- The camera’s built-in flash is used for communication between the camera and flash.
- To use a dedicated underwater strobe, prepare an underwater case, a fiber-optic cable, and other equipment.
- For details on the operation of wireless flash and underwater strobes, refer to the instruction manual for the dedicated external flash device or the underwater case.
- Turn on the dedicated strobe.
Set the flash mode of the dedicated strobe to RC mode.
- If channel and group settings are required, select CH1 for the channel, and A for the group.
- Highlight Flash in Live Control and select [ARC] (Remote Control) (“Using flash (flash photography)”).
- Take a test shot to check the operation of the flash and the resulting image.
- Be sure to check the charge level of the camera and wireless flash before taking pictures.
- When the camera flash is set to [ARC], the camera’s built-in flash is used for communication with the wireless flash. It cannot used for taking pictures.
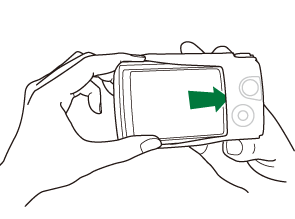
- To take pictures with wireless flash, point the remote sensor of the special external flash toward the camera, and point the flash in the direction of the subject.
Optional accessories
Using optional accessories allows you enjoy shooting in various ways.
To attach an accessory, remove the lens ring that comes with the camera.
| LED Light Guide (LG-1) | Prevents uneven illumination of the macro LED when shooting in 7 (Microscope) mode or during macro shooting.
|
|---|---|
| Flash Diffuser (FD-1) | Allows you to get close to the subject for flash photography when shooting in 7 (Microscope) mode or during macro shooting. |
| Lens Barrier (LB-T01) | Prevents smudges and scratches from appearing on the lens surface when shooting or carrying the lens.
|
| Fisheye Converter (FCON-T01)1 | Allows you to shoot wider scenes. |
| Circular Fisheye Converter (FCON-T02)1 | Take both circular fisheye and diagonal fisheye shots by simply changing the zoom position. |
| Tele Converter (TCON-T01)1 | Allows you to objects that are farther away. |
| Protection Filter (PRF-D40.5 PRO)1 | Prevents smudges and scratches from appearing on the lens surface when shooting or carrying the lens. |
A converter adapter (CLA-T01) is required to attach this accessory to the camera.
- To use optional accessories, configure the accessory settings in Live Control. g “Using optional accessories (Accessory)”
- After using the camera underwater, wash it with clean water.
- For more information, visit our website.
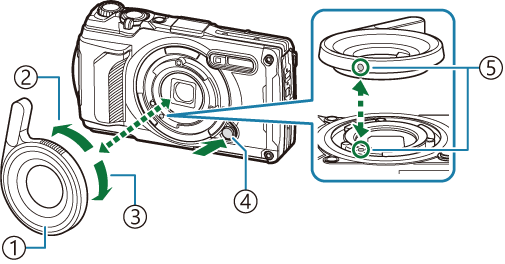
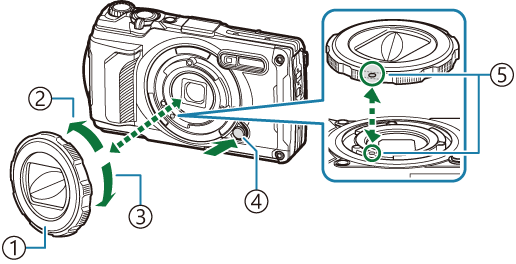
Removing and attaching the lens ring

- Lens ring
- Detachment direction
- Attachment direction
- Lens ring release button
- Attachment marker
Removing the accessory
Rotate the accessory in the detachment direction while pressing the lens ring release button.
Attaching the accessory
Align the accessory with the attachment marker and rotate it in the attachment direction until it clicks into place.
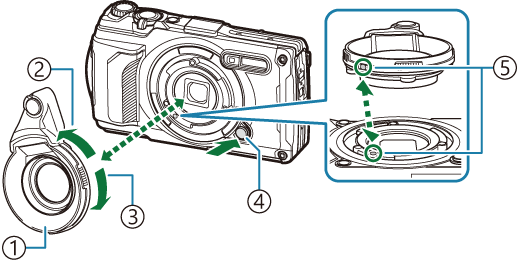
Attaching and removing the LED light guide
- LED light guide
- Detachment direction
- Attachment direction
- Lens ring release button
- Attachment marker
Attaching the accessory
Align the accessory with the attachment marker and rotate it in the attachment direction until it clicks into place.
Removing the accessory
Rotate the accessory in the detachment direction while pressing the lens ring release button.
Attaching and removing the flash diffuser
- Flash diffuser
- Detachment direction
- Attachment direction
- Lens ring release button
- Attachment marker
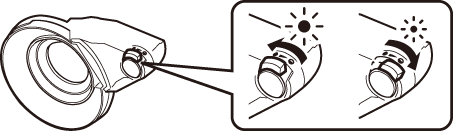
The light intensity can be switched.
Attaching the accessory
Align the accessory with the attachment marker and rotate it in the attachment direction until it clicks into place.
Removing the accessory
Rotate the accessory in the detachment direction while pressing the lens ring release button.
Attaching and removing the lens barrier
- Lens barrier
- Detachment direction
- Attachment direction
- Lens ring release button
- Attachment marker
Attaching the accessory
Align the accessory with the attachment marker and rotate it in the attachment direction until it clicks into place.
- The attachment marker is located on the back of the lens ring.
Removing the accessory
Rotate the accessory in the detachment direction while pressing the lens ring release button.
Attaching and removing the conversion lens/protection filter
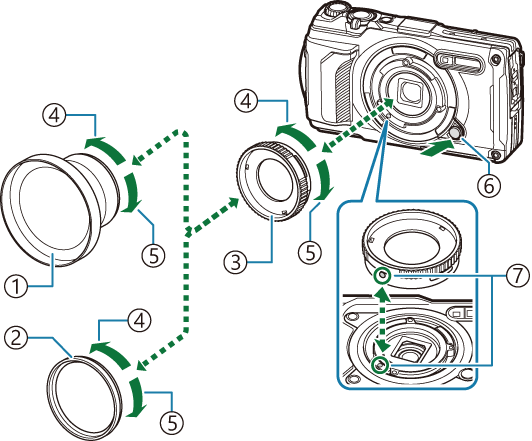
- Conversion lens
- Protection filter
- Converter adapter
- Detachment direction
- Attachment direction
- Lens ring release button
- Attachment marker
Attaching the accessory
Attach the converter adapter.
- Align the accessory with the attachment marker and rotate it in the attachment direction until it clicks into place.
- Rotate the conversion lens/protection filter in the attachment direction, and screw on the converter adapter.
Removing the accessory
- Rotate the conversion lens/protection filter in the detachment direction.
Detach the converter adapter.
- Rotate the accessory in the detachment direction while pressing the lens ring release button.