Processing options (Picture Mode)
Select the color tone of the image. You can also make individual adjustments to contrast, sharpness, and other parameters (“Processing options (Picture Mode)”). Changes to parameters are stored for each picture mode separately.
Press the OK button and then highlight Picture Mode using FG.
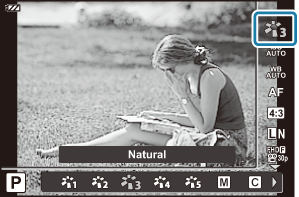
- Highlight an option using HI and press the OK button.
Picture mode options
| i-Enhance | Produces more impressive-looking results suited to the scene. |
|---|---|
| Vivid | Produces vivid colors. |
| Natural | Produces natural colors. |
| Muted | Produces flat tones. |
| Portrait | Produces beautiful skin tones. |
| Monochrome | Produces a black and white tone. |
| Custom | Select an existing picture mode, edit its parameters, and save it as a custom picture mode. |
| e-Portrait | Smooths out skin tones and texture. This mode cannot be used with bracket photography or when shooting movies. |
| Underwater | Process pictures to preserve the vivid colors seen under water.
|
| Pop Art I/II | Enhances the color and atmosphere of an image to be brighter and vivid. |
| Soft Focus | Produces an ethereal atmosphere with soft tones, making the image appear dreamlike. |
| Pale&Light Color I/II | Produces the effect of subjects floating in gentle light by scattering light across the image and slightly overexposing it. |
| Light Tone | Produces a high-quality image by softening both shadows and highlights. |
| Grainy Film I/II | Produces the impact and roughness of a black and white photograph. |
| Pin Hole I/II/III | Produces a tunnel effect like that produced using an old-fashioned camera or a toy camera by reducing peripheral brightness. |
| Diorama I/II | Produces the effect of a surreal miniature world by enhancing the saturation and contrast and blurring the out-of-focus areas of the image. |
| Cross Process I/II | Produces an unsettled, surreal atmosphere. |
| Gentle Sepia | Produces a high-quality image with a calm atmosphere by drawing out shadows and softening the overall image. |
| Dramatic Tone I/II | Enhances the local contrast of an image, emphasizing the difference between bright areas and dark areas. |
| Key Line I/II | Produces the effect of an illustration by emphasizing edges. |
| Watercolor I/II | Produces a soft, bright image by removing dark areas, blending pale colors on a white canvas, and further softening contours. |
| Vintage I/II/III | Produces a slice-of-life effect in a nostalgic, vintage tones with the discoloration and fading seen in printed film. |
| Partial Color I/II/III | Makes the subject appear more impressive by extracting the colors you want to emphasize and keeping everything else monotone. |
| Bleach Bypass I/II | Often seen in movies and other productions, the “bleach bypass” effect is added to give greater impact to cityscapes and metal textures. |
| Instant Film | A contemporary take on the skin tones and shadow gradations typical typical of film. |
II and III are altered versions of the original (I).
- When [ART] is selected for picture mode, [Color Space] will be fixed at [sRGB]. g C Custom Menu E > [Color Space]
Using [Partial Color]
Record only selected hues in color.
- Press the OK button and then highlight Picture Mode using FG.
- Highlight [Partial Color I/II/III] using HI.
Press the INFO button.
- A color ring appears in the display.
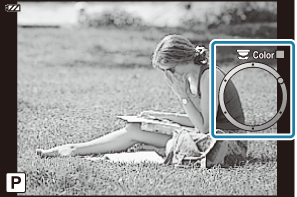
Select a color using HI or the control dial.
- The effect is visible in the display.
- Release the shutter.