Pairing the Camera and Smartphone
Follow the steps below when connecting the devices for the first time.
- Adjust pairing settings using the OM Image Share app, not the settings app included in the smartphone operating system.
- Launch the dedicated OM Image Share app that you installed on your smartphone in advance.
-
Select [Device Connection] in the q Playback Menu and press I.
- You can also start [Device Connection] by pressing and holding the MENU button when the camera is ready to shoot.
-
Follow the on-screen guide to adjust Wi-Fi/Bluetooth settings.
-
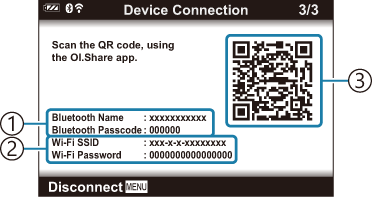
The Bluetooth local name and passcode, the Wi-Fi SSID and password, and a QR code are displayed in the monitor.

-
Bluetooth local name
Bluetooth Passcode
-
Wi-Fi SSID
Wi-Fi Password
- QR code
-
-
-
Tap the camera icon at the bottom of the OM Image Share display.
- The [Easy Setup] tab will be displayed.
-
Follow the on-screen instructions in OM Image Share to scan the QR code and adjust connection settings.
-
If you are unable to scan the QR code, follow the on-screen instructions in OM Image Share to adjust settings manually.
- Bluetooth: To connect, select the local name and enter the passcode displayed in the camera monitor into the Bluetooth settings dialog displayed in OM Image Share.
- Wi-Fi: To connect, enter the SSID and password displayed on the camera monitor into the Wi-Fi settings dialog displayed in OM Image Share.
- G1 will be displayed when pairing is complete.
-
The Bluetooth® icon indicates the status as follows:
- p: The camera is emitting a wireless signal.
- q: Wireless connection has been established.
-
-
To end the Wi-Fi connection, press MENU on the camera.
- You can also use OM Image Share to turn the camera off and end the connection.
- At default settings, Bluetooth® is kept active even after the Wi-Fi connection is terminated, allowing you to shoot remotely with a smartphone. To set the camera to also terminate Bluetooth® connection when terminating the Wi-Fi connection, set [Bluetooth] to [Off].
