Shooting tips and information
The camera does not turn on even when a battery is loaded
The battery is inserted in the wrong direction
- If you insert the battery in the wrong direction, the camera will not turn on. Be sure to insert it in the correct direction. g “Inserting the battery and card”
The battery is not fully charged
- Charge the battery. g “Charging the Battery”
The battery is temporarily unable to function because of the cold
- Battery performance drops at low temperatures. Remove the battery and warm it by putting it in your pocket for a while.
A dialog prompting you to choose a language is displayed
The dialog is displayed in the following situations.
- The camera is turned on for the first time.
- You have not chosen a language.
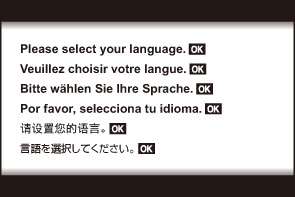
See “Initial Setup” for information on choosing a language.
No picture is taken when the shutter button is pressed
The camera has turned off automatically
- The camera automatically enters sleep mode to reduce the drain on the battery if no operations are performed for a set period of time. Press the shutter button halfway to exit sleep mode. The camera will turn off automatically if left in sleep mode for 5 minutes. g C Custom Menu H > [Sleep]
The flash is charging
- On the monitor, the A mark blinks when charging is in progress. Wait for the blinking to stop, then press the shutter button.
The camera temperature is elevated
- The camera may shut down if its internal temperature rises after extended use. Remove the battery and wait until the internal temperature has dropped enough for the camera to be used again. The camera may also become warm to the touch during use, but this does not indicate a malfunction.
Unable to focus
The camera cannot focus on subjects that are too close to the camera or that are not suited to Auto Focus (the AF confirmation mark will blink in the monitor). Increase the distance to the subject or focus on a high contrast object at the same distance from the camera as your main subject, compose the shot, and shoot.
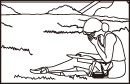
Subjects that are difficult to focus on
It may be difficult to focus using Auto Focus in the following situations.
The AF confirmation mark is blinking.
The camera will not be able to focus under the following conditions.
Subject has low contrast
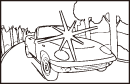
Excessively bright light in center of frame

Subject contains no vertical lines1
The AF confirmation mark lights up, but the subject is not in focus.
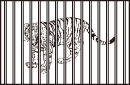
Subjects at different distances
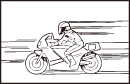
Fast-moving subject
Subject not inside AF area
It is also effective to compose the shot by holding the camera vertically to focus, and then returning to the horizontal position to take the picture.
Noise reduction is activated
- When shooting night scenes, shutter speeds are slower and noise tends to appear in images. The camera activates the noise-reduction process after shooting at slow shutter speeds. During this process, shooting is not possible. You can set [Noise Reduct.] to [Off]. g C Custom Menu C > [Noise Reduct.]
The date and time have not been set
The camera is used with the settings at the time of purchase
- The date and time of the camera are not set when purchased. Set the date and time before using the camera. g “Initial Setup”
The battery has been removed from the camera
- The date and time settings will revert to the factory default settings if the camera is left without the battery for approximately 1 day (according to in-house experiments). The settings will revert more quickly if the battery was only loaded in the camera for a short amount of time before being removed. Before taking important pictures, check that the date and time settings are correct.
Set functions are restored to their factory default settings
In shooting modes other than P/A/n, rotating the mode dial or turning off the power reverts the set functions to their default settings.
Some settings are unavailable
Some features may be unavailable depending on the shooting mode and camera settings. g ”List of configurable shooting modes”
Pictures are grainy
- In KImage quality, set the pixel count to a higher value or set compression to SF or F. g “Photo file and image size options (KImage quality)”
- Image “noise” mottling can sometimes be reduced by lowering ISO sensitivity. g “Changing ISO sensitivity (ISO Sensitivity)”
Pictures are “washed out”
This may occur when the picture is taken in backlit or semi-backlit conditions. This is due to a phenomenon called flare or ghosting. Frame the shot so that as few strong light sources as appear in the picture as possible. Flare may occur even when light sources are not present in the picture. Use your hand or other object to shade the lens from direct light sources.
Light appears in the picture
Shooting with flash in dark conditions results in images with the flash visibly reflected on specks of dust in the air.
Unknown bright dot(s) appear on the subject in the picture taken
This may be due to stuck pixel(s) on the image sensor. Perform [Pixel Mapping]. If this does not solve the problem, try performing Pixel Mapping multiple times. g “Pixel Mapping - Checking the image processing functions”
The lens is cloudy or the monitor is hard to read
Rapid temperature changes may cause lens fogging (condensation) to occur. Turn off the power, and wait for the camera body to become acclimated to the surrounding temperature and dry out before taking pictures.
Movies do not play back smoothly when viewed on a TV
The movie frame rate may not match the video standard used in the TV. View the movie on a computer instead. Before recording movies for display on a TV, select a frame rate that matches the video standard used in the device. g [Video Frame Rate]
The heading is not correct
The compass does not function as expected in the vicinity of strong electromagnetic fields, such as from televisions, microwaves, large electric motors, radio transmitters, and high-voltage power lines. Normal function can sometimes be restored by moving the camera in a figure eight while rotating your wrist.
Functions that cannot be selected from menus
Some items may not be selectable from the menus when using the arrow pad.
- Items that cannot be set with the current shooting mode.
Items that cannot be set because of an item that has already been set:
- Settings such as picture mode are unavailable when the mode dial is rotated to 0.
Only the subject is displayed and no information is shown
The display has been switched to “image only”. Press the INFO button and switch to another display mode.