Adjusting color (WB (white balance))

White balance (WB) ensures that white objects in images recorded by the camera appear white. [WB Auto] is suitable in most circumstances, but other values can be selected according to the light source when [WB Auto] fails to produce the desired results or you wish to introduce a deliberate color cast into your images.
Setting the white balance
Button
- WB button
Super control panel
- OK U WB
Menu
- MENU U a U 2. Picture Mode/WB U WB
Select a WB mode using the rear dial or HI.
- White balance can also be selected by tapping the screen.
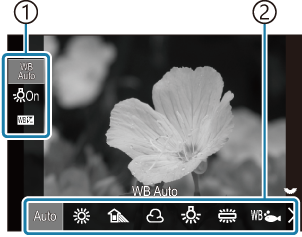
WB setting screen
- Item
- White balance
-
To fine-adjust white balance, select an option using FG.
- Items can also be selected by tapping the screen.
Auto WB Auto Most normal scenes (scenes containing objects that are white or close to white)
- This mode is recommended in most situations.
- You can choose the white balance used under incandescent lighting (“Preserving the warm tones of incandescent lighting when in WB Auto mode (N Keep Warm Color)”).
A Sunny Sunlit outdoor scenes, sunsets, fireworks
- Color temperature is set to 5300K.
B Shadow Daylight shots of subjects in the shade
- Color temperature is set to 7500K.
D Cloudy Shots taken in daylight under overcast skies
- Color temperature is set to 6000K.
G Incandescent Subjects under incandescent lighting
- Color temperature is set to 3000K.
H Fluorescent Subjects under fluorescent lighting
- Color temperature is set to 4000K.
F Underwater Underwater photography E WB Flash Light sources with the same color temperature as flash lighting
- Color temperature is set to 5500K.
H
I
J
K
One-touch WB 1-4 Situations in which you want to set white balance for a specific subject
- Color temperature is set to a value metered from a white object under the lighting what will be used in the final photograph (“One-touch white balance”).
CWB Custom WB Situations in which you can identify the appropriate color temperature
- Choose a color temperature.
Making fine adjustments to white balance of each WB mode
You can fine-tune the white balance settings. Adjustments can be made separately.
Configure options.
- Press FG on the WB setting screen (“Adjusting color (WB (white balance))”) to select the option to adjust.
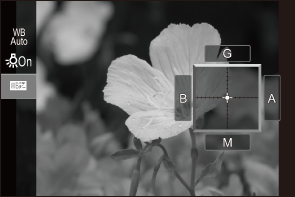
N Keep Warm Color
(only when WB Auto is used)[Off]: The camera suppresses the warm tones produced by incandescent lighting when Auto is used.
[On]: The camera preserves the warm tones produced by incandescent lighting when Auto is used.
d
(WB Compensation)Use the front dial or HI to adjust the “amber–blue” axis. Moving the pointer (0) closer to A adds a red cast and moving it closer to B adds a blue cast.
Use the rear dial or FG to adjust the “green–magenta” axis. Moving the pointer (0) closer to G adds a green cast and moving it closer to M adds a magenta cast.
When d (WB Compensation) is done, a mark (*) appears next to the WB mode icon.
Pressing the INFO button in still photography mode allows you to take a test picture with the current configuration. Press the INFO button again to return to the setting screen.
Press and hold the OK button to reset the adjusted values.
White balance can also be adjusted by tapping the screen.
- Fine-tune white balance of all white balance modes at once. g [All d]
Kelvin
(only for Custom WB)You can set the color temperature.
[2000K] – [14000K]
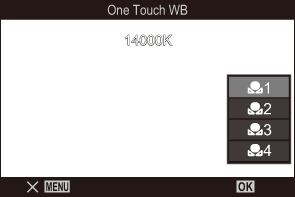
One-touch white balance
Measure white balance by framing a piece of paper or other white object under the lighting that will be used in the final photograph. Use this option to fine-tune white balance when you find it hard to obtain the desired results with white balance compensation or preset white balance options such as A (Sunny) or D (Cloudy). The camera stores the metered value for quick recall as required.
Separate values can be stored for still photography and movie recording.
- Select [H], [I], [J], or [K] (one-touch white balance 1, 2, 3, or 4) on the WB setting screen.
- Select GSet.
-
Frame a piece of colorless (white or gray) paper in the center of the display.
- Frame the piece of paper so that it fills the display. Ensure that it is free of shadows.
- Press the INFO button.
- The one-touch white balance screen appears.
-
Highlight [Yes] and press the OK button.
- The new value is saved as a preset white balance option.
- The new value is stored until one-touch white balance is measured again. Turning the power off does not erase the data.
- The new value can also be saved by tapping the screen.
Metering with the Button
Assigning [G] to a button allows the control to be used to measure white balance. g “Changing the roles of buttons (Button Settings)”
-
Frame a piece of colorless (white or gray) paper in the center of the display.
- Frame the piece of paper so that it fills the display. Ensure that it is free of shadows.
-
Hold the button to which One-Touch White Balance is assigned and press the shutter button all the way down.
- When recording movies, press the button to which One-Touch White Balance is assigned to proceed to Step 3.
- You will be prompted to choose the one-touch white balance option that will be used to store the new value.
Highlight an option using FG and press the OK button.
- One-touch white balance can also be saved to the camera by tapping the screen.
- The new value will be saved as the value for the selected setting and the camera will exit to the shooting display.