
Changing the roles of buttons (Button Settings)

Other roles can be assigned to buttons in place of their existing functions.
The functions assigned using [KButton Function] take effect in K mode. The functions assigned using [nButton Function] take effect in n/0 modes.
Customizable Controls
| Icon | Button | Default role | |
|---|---|---|---|
| K | n | ||
| R | R button | RREC (movie recording) | |
| U | U button | U View Selection (switch monitor/viewfinder) | [EVF Auto Switch] by pressing and holding the button |
| g | CP button | Computational Modes | Exposure Comp. |
| z | AF-ON button | AF-ON | |
| d | Arrow pad | Direct Function | |
| M | Arrow pad I (right) | WB (white balance) | |
| K | Arrow pad G (down) | gY (sequential shooting/self-timer) | Off |
| j | Fn button on the lens | AF Stop | |
Super control panel
- OK U KButton Function / nButton Function
Menu
- MENU U C U 1. Operations U Button Settings U KButton Function
- MENU U C U 1. Operations U Button Settings U nButton Function
- Highlight a button to configure using the FG buttons and press the OK button.
- Highlight a function to assign using the FGHI buttons and press the OK button.
Available Roles
“K only”: This role is only available in the [KButton Function] menu.
“n only”: This role is only available in the [nButton Function] menu.
- The options available vary from button to button.
| Role | Function |
|---|---|
| Custom Mode C1, 2 (C1, C2) | Recall settings for the selected custom mode. Press the control once to recall saved settings, a second time to restore the settings previously in effect (“Recalling Saved Settings”). The control continues to perform this function when a custom mode is selected with the mode dial. |
| RREC (movie recording) |
The control functions as a movie-record button. Press to start or stop recording. |
| RAWX (RAW image quality) (K only) |
If you press the button when [KX] is set to JPEG, it changes to RAW+JPEG. If it is set to RAW or RAW+JPEG, the setting does not change. You can also choose an image quality setting by holding the button and rotating a dial. |
| WB (WB) (white balance) |
Adjust white balance (“Adjusting color (WB (white balance))”). Hold the control and rotate the front or rear dial. Alternatively, you can press the button to activate settings and then rotate the dials. Highlight settings using the front or rear dial or HI. |
| G (One-touch white balance) |
Measure a value for one-touch white balance (“One-touch white balance”). To measure white balance during still photography, frame a reference object (a piece of white paper or the like) in the display, then press and hold the control and press the shutter button. A list of one-touch white balance options will be displayed, from which you can choose the location to which the new value will be saved. To measure white balance during movie recording, frame a reference object (a piece of white paper or the like) in the display and press the button. A list of one-touch white balance options will be displayed, from which you can choose the location to which the new value will be saved. |
| ISO | Adjust ISO sensitivity (“Changing ISO sensitivity (KISO / nISO)”). Hold the control and rotate the front or rear dial. Alternatively, you can press the button to activate settings and then rotate the dials. Highlight settings using the front or rear dial or HI. |
| Exposure Comp. (F) | Adjust exposure settings. Hold the control and rotate the front or rear dial. Alternatively, you can press the button to activate settings and then rotate the dials. The adjustments available vary with the shooting mode: [P]: Use the front or rear dial or HI for exposure compensation. Use the FG buttons for program shift. [A]: Use the front or rear dial or HI for exposure compensation. Use the FG buttons for aperture. [S]: Use the front or rear dial or HI for exposure compensation. Use the FG buttons for shutter speed. [M]: Use the rear dial or FG for shutter speed. Use the front dial or the HI buttons for aperture.
[B]: Use rear dial or FG to switch between bulb/time and live composite photography. Use the front dial or the HI buttons for aperture. |
| AEL (AE lock) | Press the button to lock exposure. Press again to release it. |
| Flicker Scan (Flicker Scan) | Adjust settings for Flicker Scan (“Reducing Flicker Under LED Lighting (KFlicker Scan / nFlicker Scan)”). Press the control to select [On]. You can adjust shutter speed for best results while viewing banding in the display. Press the control again to display shooting information and access other settings. Press and hold the control to select [Off] for Flicker Scan. |
| gY (sequential shooting/self-timer) (K only) |
Choose a drive (sequential shooting/self-timer) mode (“Performing the sequential/self-timer shooting”). Press once to display flash options and again select the highlighted option and exit. Set a drive (sequential shooting/self-timer) mode using the front or rear dial or the HI buttons. |
| IS Mode (IS) | Switch Image Stabilizer off (“Reducing camera shake (KImage Stabilizer / nImage Stabilizer)”). Press once to select [Off] and again to turn image stabilization on. Hold the control and rotate the front or rear dial to access Image Stabilizer options. |
| Computational Modes (g) (K only) |
Toggle roles of the CP (Computational Modes) button (“Using the CP button (Computational Modes)”). Press the button to turn on the last used Computational Modes. Press and hold the button and rotate the front or rear dial to change the settings for Computational Modes or switch to other Computational Modes. |
| High Res Shot (M) (K only) |
Pressing the button when [Off] is selected for [High Res Shot] selects the setting selected under [High Res Shot] (“Shooting still pictures in a higher resolution (High Res Shot)”). If an option other than [Off] is selected, pressing the button selects [Off]. To choose an option for [High Res Shot], hold the button and rotate the front or rear dial. |
| Live ND Shooting (ND) (K only) |
Enable the live ND filter (“Slowing the Shutter in Bright Light (Live ND Shooting)”). Press once to enable [Live ND Shooting]. Press again to disable. Hold the button and rotate the front or rear dial to adjust [ND Number] settings. |
| Focus Stacking (Q) (K only) |
Toggle [Focus Stacking] [Off] or [On] (“Increasing Depth of Field (Focus Stacking)”). To choose an option for [Focus Stacking], press and hold the button. |
| HDR (HDR) (K only) |
Enable HDR (“Taking HDR (High Dynamic Range) images (HDR)”). Press once to enable HDR. Press again to disable. Press and hold the button and rotate the front or rear dial to adjust [HDR] settings. |
| Multiple Exposure (R) (K only) |
Toggle [Multiple Exposure] [Off] or [On] (“Recording multiple exposures in a single image (Multiple Exposure)”). To choose an option for [Multiple Exposure], press and hold the button. |
| Digital Tele-converter (K: 82x / n: 81.4x) | Turn the digital teleconverter on or off (“Digital Zoom (KDigital Tele-converter / nDigital Tele-converter)”). Press once to zoom in and again to zoom out. You can turn it on/off even when you are recording a movie. During movie recording, a frame indicating the area that will be magnified by the digital teleconverter is displayed. |
| Keystone Comp. (P) (K only) |
Press the control to view keystone compensation settings (“Keystone correction and perspective control (Keystone Comp.)”). After adjusting settings, press the control again to exit. To cancel keystone compensation, press and hold the control. |
| Fisheye Compensation (N) (K only) |
Enable fisheye correction (“Correcting Fisheye Distortion (Fisheye Compensation)”). Press once to enable fisheye correction. Press again to disable. Hold the button and rotate the front or rear dial to choose from [Angle] options 1, 2, and 3. |
| AE BKT (K only) |
Pressing the button when [Off] is selected for [AE BKT] selects the setting selected under [AE BKT] (“Recording a series of shots with varied exposure (AE BKT)”). If an option other than [Off] is selected, pressing the button selects [Off]. To choose an option for [AE BKT], hold the button and rotate the front or rear dial. |
| WB BKT (K only) |
Pressing the button when [Off] is selected for [WB BKT] selects the setting selected under [WB BKT] (“Recording pictures with varied white balance (WB BKT)”). If an option other than [Off] is selected, pressing the button selects [Off]. To choose an option for [WB BKT], hold the button and rotate the front or rear dial. |
| FL BKT (K only) |
Pressing the button when [Off] is selected for [FL BKT] selects the setting selected under [FL BKT] (“Recording pictures with varied flash level (FL BKT)”). If an option other than [Off] is selected, pressing the button selects [Off]. To choose an option for [FL BKT], hold the button and rotate the front or rear dial. |
| ISO BKT (K only) |
Pressing the button when [Off] is selected for [ISO BKT] selects the setting selected under [ISO BKT] (“Recording pictures with varied ISO sensitivity (ISO BKT)”). If an option other than [Off] is selected, pressing the button selects [Off]. To choose an option for [ISO BKT], hold the button and rotate the front or rear dial. |
| ART BKT (K only) |
Toggle [ART BKT] [Off] or [On] (“Recording copies of one picture with different art filters applied (ART BKT)”). To choose an option for [ART BKT], press and hold the button. |
| Focus BKT (K only) |
Toggle [Focus BKT] [Off] or [On] (“Recording pictures with different focus positions (Focus BKT)”). To choose an option for [Focus BKT], press and hold the button. |
| AF-ON | The camera focuses with autofocus while the button is pressed (“Autofocus using the AF-ON button”). The camera stops focusing when the button is released. |
| MF (J) | Switch between AF and MF. Press once to select MF and again to return to the previous mode. The focus mode can also be selected by holding the button and rotating a dial. |
| Preset MF (PreJ) | Select [PreJ] for AF mode (“Choosing a focus mode (KAF Mode / nAF Mode)”). Press the control once to enable preset MF and again to restore the previous focus mode. The focus mode can also be selected by holding the button and rotating a dial. |
| Subject Detection (V) (K only) |
Pressing the button when [Off] is selected for [KSubject Detection] selects the setting selected under [KSubject Detection] (“Tracking Focus on Selected Subjects (KSubject Detection)”). If an option other than [Off] is selected, pressing the button selects [Off]. Press and hold the button and rotate the front or rear dial to adjust [KSubject Detection] settings. |
| AF Limiter (AFLimit) (K only) |
Enable the [KAF Limiter] (“Lens Focus Range (KAF Limiter)”). Press once to enable [KAF Limiter]. Press again to disable. Hold the button and rotate the front or rear dial to choose from three stored settings. |
| AF Area Select (Y) (AF area select) |
Configure AF Target Mode (“Choosing an AF Target Mode (AF Target Mode)”) and AF Target Point (“Choosing a Focus Target (AF Target Point)”). Press the control to view the AF target selection display. Use the front or rear dial to choose AF target mode and the arrow pad to position the AF target.
|
| YHome (YHP) (AF home position) (K only) |
Recall previously-saved [AF Target Mode], and [AF Target Point] “home position” settings. Home position settings are saved using [KY Set Home] (“Choosing the AF Home Position (KY Set Home)”).
|
| Peaking (Peak) | Toggle focus peaking on or off (“Focus Peaking Options (Peaking Settings)”). Press the control once to turn peaking on and again to turn it off. When peaking is on, peaking options (color, amount) can be displayed by pressing the INFO button. |
| Focus Ring Lock (O) | Press the control once to disable, and again to enable, the lens focus ring. This option is available when [S-AFJ], [C-AFJ], [J], [C-AF+TRJ], [PreJ], or [RAFJ] is selected for AF mode. TheJ portion of the AF mode indicator is displayed gray while the ring is disabled. In the case of lenses equipped with an MF (manual focus) clutch, pressing the button has no effect when the focus ring is in the MF position (closer to the camera body). Focus ring lock ends when you perform an operation such as turning the camera off or attaching a different lens. |
| Magnify (8) | Press the control once to display the zoom frame and again to zoom in (“Zoom frame AF/Zoom AF (Super Spot AF)”). Press the control a third time to exit zoom; to hide the zoom frame, press and hold the control. Use touch controls or FGHI to position the zoom frame. |
| Preview (z) (K only) |
Stop aperture down to the selected value. This lets you preview depth of field. Aperture stops down to the currently-selected value while the button is pressed. Preview options can be selected using [zLock] (“Choosing the Behavior of the Control Used for Depth-of-Field Preview (zLock)”). |
| Night Vision (Night LV) (K only) |
Pressing the button when [Off] is selected for [KNight Vision] selects [On]. If [On] is selected, pressing the button selects [Off]. |
| qLevel Disp (U) | Display the digital level gauge. The exposure bar display in the viewfinder functions as a level gauge. Press the control again to exit. This option takes effect when [qStyle 1] or [qStyle 2] is selected for [EVF Style]. |
| U View Selection (U) (switch monitor/viewfinder) |
Switch between viewfinder photography and live view. If [Off] is selected for [EVF Auto Switch], the display will switch between the viewfinder and the monitor. Press and hold the control to display [EVF Auto Switch] options. |
| Lens Info Settings (VLens) | Recall previously-saved lens data (“Saving lens info (Lens Info Settings)”). Recall saved data for the current lens after changing lenses or the like. |
| Multi Function (Multi Fn) (Multi-Function) |
Configure the control for use as a multi-function button (“Using multi-function options (Multi Function)”). Hold the control and rotate the front or rear dial to choose the function performed. The selected function can be performed by pressing the control. |
| Test Picture (KTest) (K only) |
Take a test shot. You can view the effects of selected settings in an actual photograph. If you keep the control pressed while pressing the shutter button, you will be able to view the results but the picture will not be saved to the memory card. |
| Direct Function (C) | Assign roles to the buttons on the arrow pad (FGHI). The following roles can be assigned: F button: [ISO] H button: [Y] (AF-target selection) I button: [WB] (WB mode) G button: [g/Y] (sequential shooting/self-timer)
|
| Flash Mode (A) (K only) |
Adjust flash settings (“Choosing a Flash Mode”). Press once to display flash options and again select the highlighted option and exit. Highlight settings using the front or rear dial or HI.
|
| Electronic Zoom (X) | Zoom power zoom lenses in or out. After pressing the control, use the arrow pad to zoom in or out. Use F or I to zoom in and G or H to zoom out.
|
| 7Lock (7) (touch control lock) |
Lock touch controls. Press and hold the button once to lock touch controls and again to unlock.
|
| AF Stop (AF Stop) | Suspend autofocus. Focus locks and autofocus is suspended while the control is pressed. Applies only to the lens j button. |
| cnView Assist (BT.709) (n only) |
Toggle [cnView Assist] [Off] or [On]. Settings can also be changed when recording movies. |
| Face & Eye Detection (1) (n only) |
Toggle [nFace & Eye Detection] [Off] or [On]. Settings can also be changed when recording movies. |
| C-AF when 5 (6C-AF) (n only) |
Toggle [nC-AF when 5] [Yes] or [No]. Settings can also be changed when recording movies. |
| Off | The control is not used. |
Using multi-function options (Multi Function)
Assign multiple roles to a single button.
- To use the multi-function feature, you must first assign [Multi Function] to a camera control. g “Customizable Controls”
Choosing a function
Hold the button to which [Multi Function] is assigned and rotate the front or rear dial.
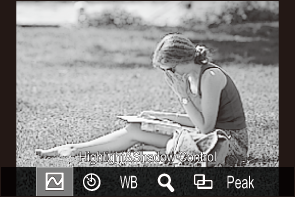
- Rotate the dial until the desired feature is highlighted. Release the button to select the highlighted feature.
- Press the button to which [Multi Function] is assigned.
- Adjust settings.
The [Multi Function] button can be used for:
| B | Highlight&Shadow Control | Change the setting using the front and rear dials. Press the INFO button to change the area (highlight, shadow, midtone) to be configured. |
|---|---|---|
| R | Color Creator | Use the front dial to adjust hue and the rear dial to adjust saturation. |
| ISO | ISO | Change the setting using the front and rear dials. |
| WB | WB | |
| 8 | Magnify | A zoom frame will be displayed. |
| O | Image Aspect | Change the setting using the front and rear dials. |
| Peak | Peaking | Turns on and off with each press of the button. |
- You can choose the options displayed. g [Multi Function Settings]
[Highlight&Shadow Control] can also be configured by following operations.
- During shooting, press the button to which F (Exposure compensation) is assigned and then press the INFO button.
- After pressing OK on the shooting display, select [Exposure Comp. / B] on the super control panel (“Functions Available with the LV Super Control/Super Control Panel”) and press OK.
Using the CP button (Computational Modes)
Press the button to turn on the last used Computational Modes. Hold the button and rotate the front or rear dial to change the settings for Computational Modes or switch to other Computational Modes.
- If the CP button has been assigned a different role, you will need to assign [Computational Modes] to a control using [KButton Function]. g “Customizable Controls”
Switch Computational Modes/Settings
Press the CP button and rotate the front dial or rear dial.
- Rotate the dial until the desired Computational Mode/Setting is highlighted. Select the highlighted feature and release the button.
- Select [Off] to exit Computational Modes and return to normal shooting.
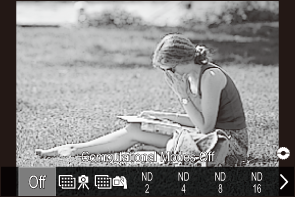
- You can photograph with the selected Computational Mode and setting.
Turn on or off Computational Modes
The operations when the CP button is pressed are listed below. The last used Computational Mode is recalled.
| Mv/Mu | High Res Shot | Turns on and off with each press of the button. |
|---|---|---|
| ND2–ND16 | Live ND Shooting | Turns on and off with each press of the button. |
| Q | Focus Stacking | Turns on and off with each press of the button. To choose an option for [Focus Stacking], press and hold the button. |
| HDR1/HDR2 | HDR | Turns on and off with each press of the button. |
| R | Multiple Exposure | Turns on and off with each press of the button. To choose an option for [Multiple Exposure], press and hold the button. |
- You can choose the options displayed. g “Choosing the Settings Available via the CP button (g Button Settings)”
Recording a movie by pressing the shutter button (nShutter Function)

Configure the shutter button as a R (movie record) button.
Menu
- MENU U C U 1. Operations U Button Settings U nShutter Function
| Off | The shutter button cannot be used to record movies. |
|---|---|
| RREC | Press the shutter button all the way down to start or stop movie recording. |
Setting the display when pressing the OK button (Setting screen opened by w)
Set whether to display or hide each operation screen accessed by pressing the OK button in the shooting standby screen.
Menu
- MENU U C U 1. Operations U Button Settings U Setting screen opened by w
| 0 | Select an option using FG and press the OK button to put a check (P) next to it. To remove the check, press the OK button again. [Live Guide]/[Live SCP] |
|---|---|
| ART | Select an option using FG and press the OK button to put a check (P) next to it. To remove the check, press the OK button again. [Art Menu]/[Live SCP] |
| SCN | Select an option using FG and press the OK button to put a check (P) next to it. To remove the check, press the OK button again. [Scene Menu]/[Live SCP] |
- You can also tap the check box to put or remove the check (P).
- The screens for the checked (P) options can be switched by pressing the INFO button while the operation screen is displayed after pressing the OK button in the shooting standby screen.