
Using art filters (ART Mode)
- Rotate the power lever to K or n.
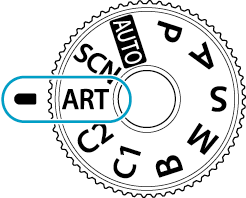
Rotate the mode dial to ART.
Use HI to highlight a filter.
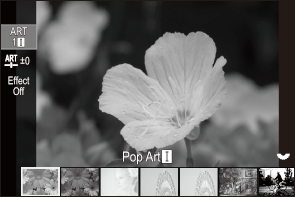
-
Press FG to select [Add Effects], [Color Filter], or [Monochrome Color].
- See “Adjust the level of the art filter (Fine-Tune)” for D (Fine-Tune).
- See “Using [Partial Color]” for Q (Partial Color).
- Use HI to set the filters and effects and press the OK button.
-
Release the shutter.
- Press the OK button to choose a different art filter. If effects are displayed, press F.
- The effects available vary with the selected filter (Soft Focus Effect, Pin Hole Effect, Frame Effect, White Edge Effect, Star Light Effect, Color Filter, Monochrome Color, Blur Effect, or Shade Effect).
- Filters and effects can also be selected using touch controls.
Types of art filters
K only: This option can only be selected when the power lever is rotated to K.
| a | Pop Art I/II | Creates an image that emphasizes the beauty of color. |
|---|---|---|
| b | Soft Focus | Creates an image that expresses a soft tone atmosphere. |
| c | Pale&Light Color I/II | Creates an image that expresses warm light by scattering overall light and slightly overexposing the image. |
| d | Light Tone | Creates a high-quality image by softening both shadows and highlights. |
| e | Grainy Film I/II | Creates an image that expresses the roughness of black and white images. |
| f | Pin Hole I/II/III | Creates an image that looks as if it was taken using an old or toy camera by dimming the image perimeter. |
| g | Diorama I/II | Creates a miniature-like image by emphasizing saturation and contrast, and blurring unfocused areas. |
| h | Cross Process I/II | Creates an image that expresses a surreal atmosphere. Cross Process II creates an image that emphasizes magenta. |
| i | Gentle Sepia | Creates a high-quality image by drawing out shadows and softening the overall image. |
| j | Dramatic Tone I/II | Creates an image that emphasizes the difference between brightness and darkness by partially increasing contrast. |
| k | Key Line I/II | Creates an image that emphasizes edges and adds an illustrative style. |
| l | Watercolor I/II | Creates a soft, bright image by removing dark areas, blending pale colors on a white canvas, and further softening contours. |
| m | Vintage I/II/III | Expresses an everyday shot in a nostalgic, vintage tone using printed film discoloration and fading. |
| n | Partial Color I/II/III | Impressively expresses a subject by extracting colors you want to emphasize and keeping everything else monotone. |
| o | Bleach Bypass I/II | The “bleach bypass” effect, which you may recognize from motion pictures and the like, can be used to great effect in shots of streetscapes or metal objects. |
| p | Instant Film | A contemporary take on the shadow and skin tones typical of film. |
| x | ART BKT (ART bracketing) (K only) |
Records images using all art filter options with a single shot. Press the G button, select [ART BKT Setting], and press the OK button to select the filter to be recorded. |
II and III are altered versions of the original (I).
- To maximize the benefits of the art filters, some of the shooting function settings are disabled.
- If [RAW] is currently selected for image quality (“Configuring KX”), image quality will automatically be set to RAW+JPEG. Art filters apply only to the JPEG copy.
- Depending on the scene, the effects of some settings may not be visible, while in other cases tone transitions may be ragged or the image rendered more “grainy”.
- The star light effect is not applied to movie recording.
- Playback may differ according to the filters, effects, or movie quality settings applied.
Adjust the level of the art filter (Fine-Tune)
Adjust the level of the effect for pop art, soft focus, pin hole, cross process, or instant film.
- Rotate the mode dial to ART.
- Select [Pop Art I/II], [Soft Focus], [Pin Hole I/II/III], [Cross Process I/II], or [Instant Film].
-
Press FG to select [Fine-Tune].
A slider appears on the screen.
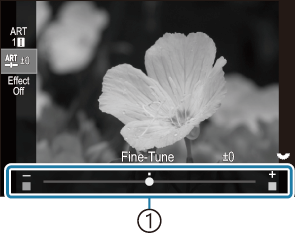
- Slider
-
Rotate the front or rear dial to adjust the level of the art filter.
- The effect is visible in the display.
- The slider can also be operated using touch controls.
- The level of the art filter can also be adjusted with the HI buttons.
- For art filters whose levels have been adjusted, a mark (*) will appear on the icon.
- You can reset the level of the art filter by pressing and holding the OK button.
-
Press the OK button.
- Save the current setting and exit to the shooting display.
- Release the shutter.
- Press the OK button to adjust the level of the art filter after shooting. If the slider is not displayed, press FG to select [Fine-Tune].
Using [Partial Color]
Record only selected hues in color.
- Rotate the mode dial to ART.
- Select [Partial Color I/II/III].
-
Press the G button to select [Color].
A color ring appears in the display.
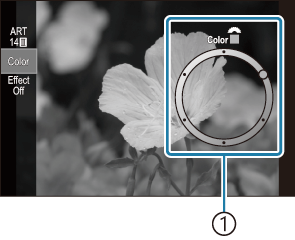
- Color ring
-
Rotate the front or rear dial to choose a color.
- The effect is visible in the display.
- Colors can also be selected with the HI buttons.
- Colors can also be selected tapping the color ring.
-
Press the OK button.
- Save the current setting and exit to the shooting display.
- Release the shutter.
- Press the OK button to change the color after shooting. If the color ring is not displayed, press the FG buttons to select [Color].