
Processing options (KPicture Mode / nPicture Mode)

Choose how pictures are processed during shooting to enhance color, tone, and other properties. Choose from preset picture modes according to your subject or artistic intent. Contrast, sharpness, and other settings can be adjusted separately for each mode. You can also add artistic effects using art filters. Art filters give you the option of added frame effects and the like. Adjustments to individual parameters are stored separately for each picture mode and art filter.
With Monochrome Profile and Color Profile, color filter effects can be applied to monochrome images, and the saturation of color images can be adjusted for each color.
Color Creator can adjust hue and color.
Changing the modes using the Profile Control Switch
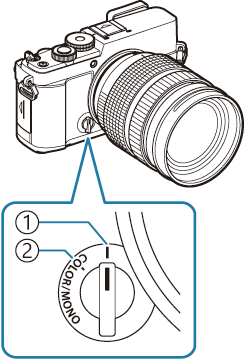
- | (Picture Mode)
- COLOR/MONO (Color Profile Control/Monochrome Profile Control)
- Rotate the profile control switch to COLOR/MONO (Color Profile Control/Monochrome Profile Control) during live view to display the setting screen for each mode.
- When the mode dial is set to 9, SCN, or ART, the mode does not change even if the profile control switch is operated.
- COLOR/MONO is not available in 0 mode. Rotate the profile control switch to | (Picture Mode).
- When [nPicture Mode] is set to a setting other than [Same as K], the mode does not change even if the profile control switch is operated in n mode.
Setting with Super Control Panel/Menu
Super control panel
- OK U Picture mode
Menu
- MENU U a U 2. Picture Mode/WB U KPicture Mode
- MENU U n U 2. Picture Mode U nPicture Mode
When in n/0 modes with the camera configured as follows, you can set the same setting as the [KPicture Mode] (“Setting Picture Mode”) setting by selecting Picture Mode from the super control panel.
- [nPicture Mode] is set to [Same as K] from the menu
Setting Picture Mode
Select a picture mode using the rear dial or HI.
- Picture modes can also be selected by tapping the screen.
- Detailed options of a Picture Mode can be set. g “Setting detailed options of Each Mode”
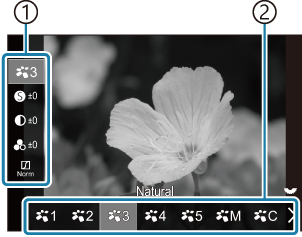
Picture Mode setting screen
- Item
- Picture mode
Types of Picture Mode
| d | i-Enhance | The camera adjusts colors and contrast for optimal results according to the type of subject. |
|---|---|---|
| e | Vivid | Choose for vivid colors. |
| f | Natural | Choose for natural colors. |
| g | Muted | Choose for pictures that will later be retouched. |
| h | Portrait | Enhance skin tones. |
| i | Monochrome | Record pictures in monochrome. You can apply color filter effects and choose a tint. |
| j | Custom | Adjust picture mode parameters to create a custom version of a selected picture mode. |
| G | e-Portrait | Enhance the skin to make it brighter and smoother. |
| k | Underwater | Process pictures to preserve the vivid colors seen under water.
|
| R | Color Creator | Adjust hue and color to suit your creative intent. |
| a | Pop Art | Uses Art Filter settings. Art effects can also be used. Available effects differ depending on the art filter. |
| b | Soft Focus | |
| c | Pale&Light Color | |
| d | Light Tone | |
| e | Grainy Film | |
| f | Pin Hole | |
| g | Diorama | |
| h | Cross Process | |
| i | Gentle Sepia | |
| j | Dramatic Tone | |
| k | Key Line | |
| l | Watercolor | |
| m | Vintage | |
| n | Partial Color | |
| o | Bleach Bypass | |
| p | Instant Film |
- In K mode, art filters and color creator apply only to the JPEG copy. [RAW+JPEG] is automatically selected for image quality in place of [RAW].
Setting Color Profile Control
The saturation of color images can be adjusted for each color, Color filter effects can be applied to monochrome images (Saturation adjustment), the amount of light around an image can be adjusted (Shading), and the brightness and darkness of an image can be controlled (Highlight & Shadow Control).
Select a picture mode using the rear dial or HI.
- Profiles can also be selected by tapping the screen.
Detailed options of a Color Profile Control can be set. g “Setting detailed options of Each Mode”
A mark (*) appears next to the icon for the profiles in which the settings for detailed items have been changed. Press and hold the OK button to reset all the setting values for detailed items of the selected profile.
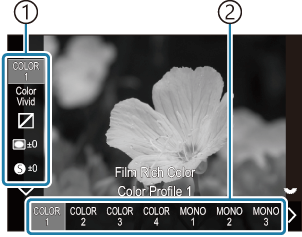
Color Profile Control setting screen
- Item
- Profile
Types of Color Profile Control
| COLOR1 | Film Rich Color Color Profile 1 |
This results in a color tone with depth and richness. |
|---|---|---|
| COLOR2 | Film Vivid Color Profile 2 |
This creates a film-like effect with high saturation and rich colors. |
| COLOR3 | Film Soft Tone Color Profile 3 |
It creates a light and soft color tone. |
| COLOR4 | Standard (Natural) Color Profile 4 |
This is a standard (Natural) preset. Each setting value is set to default (±0). |
- In K mode, color profiles apply only to the JPEG copy. [RAW+JPEG] is automatically selected for image quality in place of [RAW].
Setting Monochrome Profile Control
Color filter effects can be applied to monochrome images (Color Filter Effects), the amount of light around an image can be adjusted (Shading), and the brightness and darkness of an image can be controlled (Highlight & Shadow Control).
Select a picture mode using the rear dial or HI.
- Profiles can also be selected by tapping the screen.
Detailed options of a Monochrome Profile Control can be set. g “Setting detailed options of Each Mode”
A mark (*) appears next to the icon for the profiles in which the settings for detailed items have been changed. Press and hold the OK button to reset all the setting values for detailed items of the selected profile.
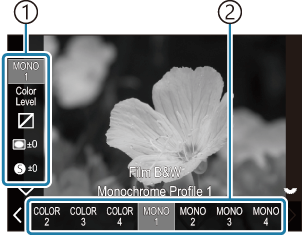
Monochrome Profile Control setting screen
- Item
- Profile
Types of Monochrome Profile Control
| MONO1 | Film B&W Monochrome Profile 1 |
This creates a monochrome film-like finish. |
|---|---|---|
| MONO2 | Film IR Monochrome Profile 2 |
This produces an infrared film-like effect. |
| MONO3 | Film Low Contrast Monochrome Profile 3 |
This suppresses contrast for a softer look. |
| MONO4 | Standard (Monotone) Monochrome Profile 4 |
This is a standard (monochrome) preset. Each setting value is set to default (±0). |
- In K mode, monochrome profiles apply only to the JPEG copy. [RAW+JPEG] is automatically selected for image quality when the image quality mode is set to [RAW].
Setting detailed options of Each Mode
Press FG on each setting screen (“Setting Picture Mode”) to select the option you want to set.
- Available settings vary depending on the selected mode.
- Items to be set can also be selected by tapping the screen.
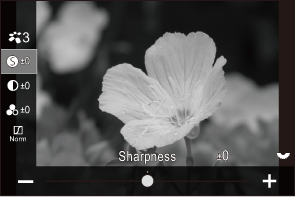
S Sharpness Adjust image sharpness. Outlines can be emphasized for a sharp, clear picture.
[-2] – [±0] – [+2]
F Contrast Adjust image contrast. Increasing contrast heightens the difference between bright and dark areas for a harder, more well-defined picture.
[-2] – [±0] – [+2]
E Saturation Adjust color saturation. Increasing saturation makes pictures more vivid.
[-2] – [±0] – [+2]
T Gradation Adjust color brightness and shading. Bring pictures closer to what you envisage by, for example, brightening the entire picture. Depending on the contrast, you can produce both dark gradations and bright gradations.
[Shadow Adj]: Divides the image into detailed regions and adjusts the brightness separately for each region. This is effective for images with areas of large contrast in which the whites appear too bright or the blacks appear too dark.
[Gradation Normal]: Optimal shading. Recommended in most circumstances.
[Gradation High Key]: Uses a tone suitable for a bright subject.
[Gradation Low Key]: Uses a tone suitable for a dark subject.
Effect Effect Choose the strength of i-Enhance.
[Effect: Low]: Adds a low effect to images.
[Effect: Standard]: Adds an effect between “low” and “high” to images.
[Effect: High]: Adds a high effect to images.
Filter Color Filter Color filter effects can be added to monochrome picture modes. Depending on the color of the subject, color filter effects can make subjects brighter or enhance contrast. Orange adds more contrast than yellow, red more contrast than orange. Green is a good choice for portraits and the like.
[N:None]: No filter effect.
[Ye:Yellow]: Reproduces clearly defined white cloud with natural blue sky.
[Or:Orange]: Slightly brings out blue skies or the light of the setting sun.
[R:Red]: Further brings out blue skies or autumn foliage.
[G:Green]: Adds warmth to skin tones in portraits. The green filter also emphasizes the reds in lipstick.
Color Monochrome Color Add a tint to pictures when using monochrome picture modes.
[N:Normal]: Creates a normal black and white image.
[S:Sepia]: Shoot in sepia-tinted monochrome.
[B:Blue]: Shoot in blue-tinted monochrome.
[P:Purple]: Shoot in purple-tinted monochrome.
[G:Green]: Shoot in green-tinted monochrome.
d
e
f
g
h
i
j Picture Mode Choose a picture mode you want to adjust when using [Custom].
[i-Enhance], [Vivid], [Natural], [Muted], [Portrait], [Monochrome]
R Color Creator Rotate the front dial to adjust hue. Rotate the rear dial to adjust saturation.
To reset exposure compensation, press and hold the OK button.
D Fine-Tune Adjust the level of the effect for pop art, soft focus, pin hole, cross process, or instant film.
[-5] – [±0] – [+5]
Effect Add Effects Add effects to an art filter.
The effects that can be added differ depending on the art filter.
With some art filters, Color Filter and Monochrome Color can be adjusted.
Color Partial Color Selects the art filter “partial color”. l Color/Level Choose from eight colors and three intensities to apply a color filter effect to a black-and-white image.
Use the front dial to set the type of the color filter and the rear dial to set the intensity.
Press and hold the OK button to reset the adjusted values.
f Highlight&Shadow Control Adjust brightness separately for highlight, shadow, and midtone.
Press the INFO button to change the area (highlight, shadow, and midtone) to be configured. Change the setting using the front and rear dials.
Press and hold the OK button to reset the adjusted values.
j Shading Effect Adjust brightness of the peripheral areas of the image.
[-5] – [±0] – [+5]
k Film Grain Effect Add a grainy effect similar to the grain of black and white film.
[Film Grain Effect Off] / [Film Grain Effect Low] / [Film Grain Effect Medium] / [Film Grain Effect High]
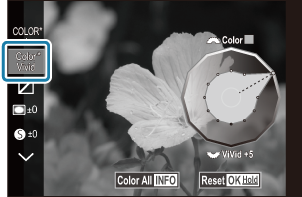
m Color/Vivid The saturation of each of the 12 colors can be adjusted within a range of ±5.
Use the front dial to adjust hue and the rear dial to adjust saturation.
Press and hold the OK button to reset the adjusted values.
Press the INFO button to switch between changing all colors at once or changing them individually.
When [Color All] is displayed on the color profile control screen, all colors can be changed at once. Adjust saturation using the rear dial.
- Depending on the scene, the effects of some settings may not be visible, while in other cases tone transitions may be ragged or the image rendered more “grainy”.
When a setting value is changed in Monochrome Profile Control and Color Profile Control, a mark (*) will appear on the icon of the item.
- The settings are stored in the selected profile ([MONO1] to [MONO4] and [COLOR1] to [COLOR4]).
In the following cases, Shading Control is fixed at ±0 and cannot be changed.
- High Res Shot / Live ND Shooting / Multiple Exposure / Keystone Comp. / Fisheye Compensation / ISO BKT
In the following cases, Film Grain Effect is set to [Off] and cannot be changed.
- High Res Shot / Live ND Shooting / Multiple Exposure / Keystone Comp. / Fisheye Compensation / ISO BKT / Shading Control set to a value other than ±0 during movie recording
Setting detailed options of a Picture Mode Exclusive for Movies
- Select [nPicture Mode] from the menu.
Highlight an item using FGHI.
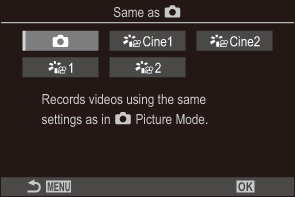
K Same as K Movies are recorded using the same setting as configured in KPicture Mode. aCine1 OM-Cinema1 Record movies with a cinematic expression using yellow in the highlights and blue in the shadows to create color contrast. It is recommended to set [Frame Rate] to [24p]. aCine2 OM-Cinema2 Record movies with a cinematic expression using soft colors featuring cyan tones and weak contrast. It is recommended to set [Frame Rate] to [24p]. a1 Flat Movies are recorded using a tone curve adapted to color grading. a2 OM-Log400 Movies are recorded using a log tone curve for greater freedom during color grading.