Using Shooting Modes
Use the mode dial to select the shooting mode, and then shoot the image.

- Indicator
- Mode icon
Types of shooting modes
For how to use the various shooting modes, see the following.
| P | Program AE (“Letting the camera choose aperture and shutter speed (P: Program AE)”) |
|---|---|
| A | Aperture-priority AE (“Choosing aperture (A: Aperture-Priority AE)”) |
| S | Shutter-priority AE (“Choosing shutter speed (S: Shutter-Priority AE)”) |
| M | Manual exposure (“Choosing aperture and shutter speed (M: Manual Exposure)”) |
| B | Bulb/time (“Long Exposures (B: Bulb/Time)”) |
| Live composite (“Lighten Blending (B: Live Composite Photography)”) | |
| 0 | Auto (“Letting the camera choose the settings (AUTO mode)”) |
| SCN | Scene (“Shooting in scene mode (SCN mode)”) |
| ART | Art Filter (“Using art filters (ART mode)”) |
| C | Custom (“Using Custom Modes (C custom modes)”) |
- For information on the n position on the mode dial, see “Recording movies in movie mode (n)”.
Choosing shooting modes
Press the mode dial lock to release the lock, and then rotate the dial to set the mode you wish to use.
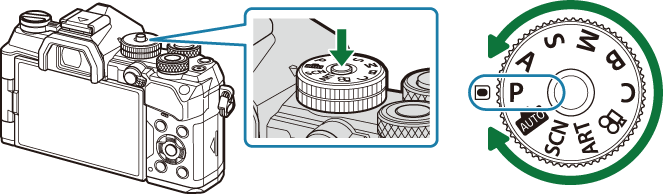
When the mode dial lock has been pressed down, the mode dial is locked. Each time you press the mode dial lock, it switches between locked/released.
Shooting still pictures
- Rotate the mode dial to the mode you wish to use.
Frame the shot.
- Be careful that your fingers or the camera strap do not obstruct the lens or AF illuminator.
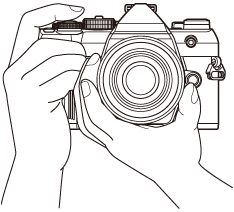
Landscape position
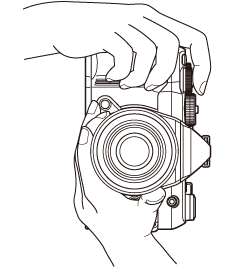
Portrait position
Adjust the focus.
Position the AF frame over your subject.
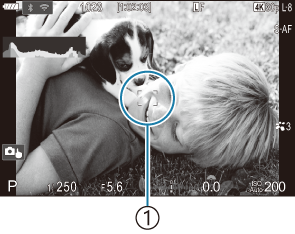
- AF frame
Lightly press the shutter button down to the first position (press the shutter button halfway).

The AF confirmation mark (N) will be displayed, and a green frame (AF target) will be displayed in the focus location.
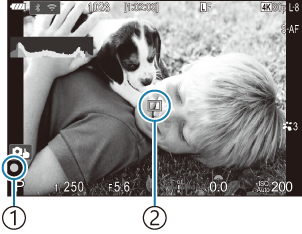
- AF confirmation mark
- AF target
- You can also focus by pressing the AF-ON button (“Autofocus using the AF-ON button”).
- If the camera is unable to focus, the AF confirmation mark will flash (“Unable to focus”).
- The AF frame varies with the option chosen for AF-target mode. Change the area (“Choosing an AF Target Mode (AF Target Mode)”) and position (“Choosing a Focus Target (AF Target Point)”) of the AF target as required.
- The AF frame is not displayed when [bAll] (all targets) is chosen for AF-target mode (“Choosing an AF Target Mode (AF Target Mode)”).
Release the shutter.
- Press the shutter button all the way (fully).
- The camera will release the shutter and take a picture.

- You can focus and take pictures using touch controls. g “Shooting with touch screen operations”
Shooting with touch screen operations

You can tap the subject to focus and take a photograph.
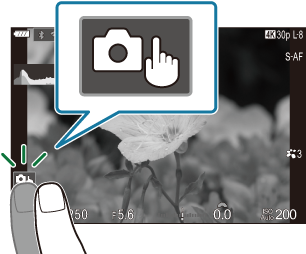
| E | Tap a subject to focus and automatically release the shutter.
|
|---|---|
| F | Shooting with touch screen operations is disabled. |
| G | Tap to display an AF target and focus on the subject in the selected area. You can use the touch screen to choose the position and size of the focus frame. Photographs can be taken by pressing the shutter button. |
| H | Tap to select a face to focus when the camera detects multiple faces. H is displayed when [Face & Eye Detection] is set to a setting other than [Off] (“Tracking Focus on Faces or Eyes of Subjects (Face & Eye Detection)”).
|
- Tapping an icon switches the settings.
- Do not tap the display with your fingernails or other sharp objects.
- Gloves or monitor covers may interfere with touch screen operation.
Previewing the subject (G)
Tap the subject in the display.
- An AF target will be displayed.
Use the slider to choose the size of the frame.
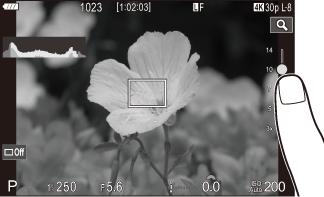
- Tap X to turn off the display of the AF target.
Use the slider to adjust the size of the AF target, and then tap a to zoom in at the frame position.
Use your finger to scroll the display when the picture is zoomed in.

- Tap Z to cancel the zoom display.
The situations in which touch screen operations are not available include the following.
- When buttons or dials are in use
- You can disable the touch screen operation. g “Disabling Touch Controls (Touchscreen Settings)”
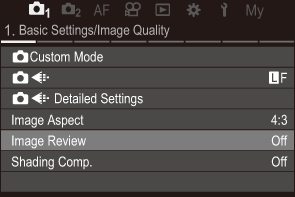
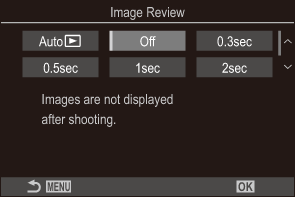
Photo Review (Image Review)

Pictures are displayed immediately after shooting. This gives you a chance to quickly review the shot. You can choose how long pictures are displayed or disable photo review altogether.
To end photo review and resume shooting at any time, press the shutter button halfway.
| Auto q | Switch to playback after shooting. You can delete images and perform other playback operations. |
|---|---|
| Off | Photo review disabled. The camera continues to display the view through the lens after shooting. |
| 0.3 – 20sec | Choose how long photos are displayed. |
- Press the MENU button to view the menus.
Highlight the a tab using the front dial.
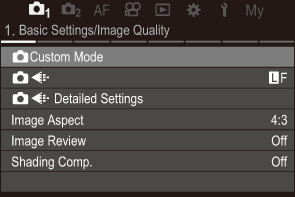
- Highlight [1. Basic Settings/Image Quality] using the HI buttons or the rear dial.
Highlight [Image Review] using the FG buttons and press the OK button.
Change the settings using the FGHI buttons and press the OK button.
- Press the MENU button to exit the menus.