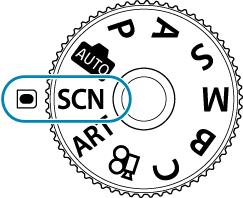
Shooting in scene mode (SCN mode)
The camera automatically optimizes settings for the subject or scene.
Rotate the mode dial to SCN.
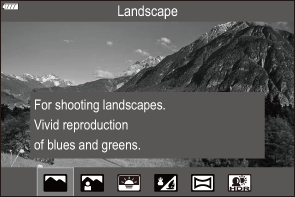
Use FGHI to highlight a scene and press the OK button.

Use HI to highlight a scene mode and press the OK button.
Release the shutter.
- To choose a different scene, press the OK button. Next, press the MENU button to return to the scene-selection display.
Types of scene modes
Scenery
| F | Landscape | Suitable for landscape shooting. |
|---|---|---|
| D | Portrait + Landscape | Suitable for portraits featuring a landscape in the background. Blues, greens, and skin tones are captured beautifully. |
| Y | Sunset | Suitable for shooting the sunset. |
| L | Beach & Snow | Suitable for shooting at snow-capped mountains, seascapes in the sun, and other whitish scenes. |
| X | Panorama | Take photos that can afterwards be joined on a computer to create a panorama.
|
| A | Backlight HDR | Suitable for high-contrast scenes. Each time the shutter button is pressed, the camera takes four shots that are automatically combined to form a single, correctly exposed image when shooting is complete. |
Close-ups
| Q | Nature Macro | Suitable for vivid close-ups of flowers or insects. |
|---|---|---|
| P | Macro | Suitable for close-ups. |
| U | Multi Focus Shot | The camera takes eight photos, varying the focus distance with each shot. |
| M | Documents | Suitable for photos of timetables or other documents. The camera heightens the contrast between the text and background. |
People
| D | Portrait + Landscape | Suitable for portraits featuring a landscape in the background. Blues, greens, and skin tones are captured beautifully. |
|---|---|---|
| B | Portrait | Suitable for portrait shooting. Brings out skin texture. |
| E | e-Portrait | Smooths out skin tones and texture. The camera records two pictures: one with the effect applied and one without. |
| J | Portrait + Nightscape | Suitable for portrait shooting against a background of night view. Attach an external flash unit designed for use with the camera (“Attaching Compatible Flash Units”). We recommend that you use a tripod and either OM Image Share or an optional remote control (“Shooting remotely with a smartphone (Live View)”, “Shooting from the remote control”). |
| S | Children | Suitable for photographs of children and other active subjects. |
Nightscapes Light Trails
| T | Light Trails | The camera automatically shoots multiple images, takes newly bright areas only, and composites them into a single image. With normal long exposure, an image of light trace such as star trails with bright buildings tends to get too bright. You can capture them without over exposure while checking the progress. Press the shutter button to start shooting, then view the changing result in the monitor and press the shutter button again to end shooting once the desired result is achieved (maximum 3 hours). We recommend that you use a tripod and either OM Image Share or an optional remote control (“Shooting remotely with a smartphone (Live View)”, “Shooting from the remote control”).
|
|---|---|---|
| G | Nightscape | Suitable for tripod shooting of night scenes. We recommend that you use a tripod and either OM Image Share or an optional remote control (“Shooting remotely with a smartphone (Live View)”, “Shooting from the remote control”). |
| J | Portrait + Nightscape | Suitable for portrait shooting against a background of night view. Attach an external flash unit designed for use with the camera (“Attaching Compatible Flash Units”). We recommend that you use a tripod and either OM Image Share or an optional remote control (“Shooting remotely with a smartphone (Live View)”, “Shooting from the remote control”). |
| O | Handheld Starlight | Suitable for shooting night scenes without a tripod. Reduces blur when shooting low light/illuminated scenes. The camera makes eight exposures and combines them into a single photograph. |
| K | Fireworks | Suitable for shooting fireworks at night. We recommend that you use a tripod and either OM Image Share or an optional remote control (“Shooting remotely with a smartphone (Live View)”, “Shooting from the remote control”). |
Motion
| C | Sport | Suitable for fast action shooting. The camera will take photos while the shutter button is pressed. |
|---|---|---|
| S | Children | Suitable for photographs of children and other active subjects. |
| W | Panning | Choose to blur the background behind moving objects. The camera chooses the optimal shutter speed for panning shots based on camera motion. |
Indoors
| N | Candlelight | Suitable for shots of candlelit scenes. Warm colors are preserved. |
|---|---|---|
| R | Silent I | Disable camera sounds and lights in situations in which they may be unwelcome. |
| B | Portrait | Suitable for portrait shooting. Brings out skin texture. |
| E | e-Portrait | Smooths out skin tones and texture. The camera records two pictures: one with the effect applied and one without. |
| S | Children | Suitable for photographs of children and other active subjects. |
| A | Backlight HDR | Suitable for high-contrast scenes. Each time the shutter button is pressed, the camera takes four shots that are automatically combined to form a single, correctly exposed image when shooting is complete. |
- In [Panning], W is displayed during panning detection, and V is displayed when nothing is detected.
- To maximize the benefits of the scene modes, some of the shooting function settings are disabled.
- Some time may be needed to record pictures taken using [e-Portrait]. In addition, when the image quality mode is [RAW], the image is recorded in RAW+JPEG.
- Movies cannot be recorded using [e-Portrait], [Handheld Starlight], [Panorama], [Backlight HDR], or [Light Trails].
- [Handheld Starlight] pictures taken with [RAW] selected for image quality will be recorded in RAW+JPEG format, with the first frame recorded as a RAW image and the final composite as a JPEG image.
- [Backlight HDR] records HDR-processed images in JPEG format. When the image quality mode is set to [RAW], the image is recorded in RAW+JPEG.
When using a lens with an image stabilizer switch in [Panning], turn the image stabilizer switch off.
Sufficient panning effects may not be obtained in bright conditions. Use a commercially available ND filter to obtain effects more easily.
- Shooting will end if zoom is adjusted while photographs are being taken in [Multi Focus Shot] mode.
- No pictures can be taken in [Multi Focus Shot] mode when a Four Thirds lens is attached.
Shooting a Panorama
Pictures taken using this option can be joined together to form a panorama. You will need to install the latest version of OM Workspace on your computer to join pictures together to form a panorama. g “Installing Software”
- Highlight [Panorama] in the scene mode menu (“Shooting in scene mode (SCN mode)”) and press the OK button.
- Use FGHI to choose a pan direction.
Take a picture, using the guides to frame the shot.
- Focus, exposure, and other settings are fixed at the values for the first shot.
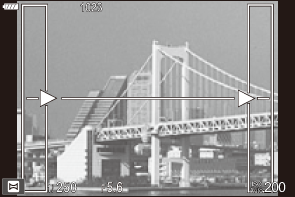
Take the remaining images, framing each shot so that the guides overlap with the previous picture.

- A panorama may include up to 10 images. A warning indicator (c) is displayed after the tenth shot.
- During panorama shooting, the image previously taken for position alignment will not be displayed. With the frames or other markers for display in the images as a guide, set the composition such that the edges of the overlapping images overlap within the frames.
- After taking the last shot, press OK to end the series.