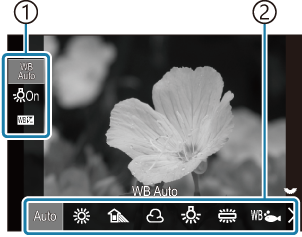
Adjusting color (WB (white balance))

White balance (WB) ensures that white objects in images recorded by the camera appear white. [WB Auto] is suitable in most circumstances, but other values can be selected according to the light source when [WB Auto] fails to produce the desired results or you wish to introduce a deliberate color cast into your images.
Setting the white balance
Super control panel
- OK U White balance
Menu
- MENU U a U 2. Picture Mode/WB U KWB
- MENU U n U 2. Picture Mode/WB U nWB
- At default settings, [nWB] is not available. White balance shares a common setting value for still photography mode (K mode) and movie mode (n/0 modes). Put a check (P) for [WB] in [K/n Separate Settings] to configure the settings individually for still photography mode (K mode) and movie mode (n/0 modes).
Select a WB mode using the rear dial or HI.

WB setting screen
- Item
- White balance
To fine-adjust white balance, select an option using FG.
Auto WB Auto Most normal scenes (scenes containing objects that are white or close to white)
- This mode is recommended in most situations.
- You can choose the white balance used under incandescent lighting (“Preserving the warm tones of incandescent lighting when in WB Auto mode (KN Keep Warm Color / nN Keep Warm Color)”).
A Sunny Sunlit outdoor scenes, sunsets, fireworks
- Color temperature is set to 5300K.
B Shade Daylight shots of subjects in the shade
- Color temperature is set to 7500K.
D Cloudy Shots taken in daylight under overcast skies
- Color temperature is set to 6000K.
G Incandescent Subjects under incandescent lighting
- Color temperature is set to 3000K.
H Fluorescent Subjects under fluorescent lighting
- Color temperature is set to 4000K.
F Underwater Underwater photography E WB Flash Light sources with the same color temperature as flash lighting
- Color temperature is set to 5500K.
H
I
J
K
One-touch WB 1-4 Situations in which you want to set white balance for a specific subject
- Color temperature is set to a value metered from a white object under the lighting what will be used in the final photograph (“One-touch white balance).
CWB Custom WB Situations in which you can identify the appropriate color temperature
- Choose a color temperature.
Making fine adjustments to white balance of each WB mode
You can fine-tune the white balance settings. Adjustments can be made separately.
Configure options.
- Press FG on the WB setting screen (“Adjusting color (WB (white balance))”) to select the option to adjust.

N Keep Warm Color
(only when WB Auto is used)[Off]: The camera suppresses the warm tones produced by incandescent lighting when Auto is used.
[On]: The camera preserves the warm tones produced by incandescent lighting when Auto is used.
d
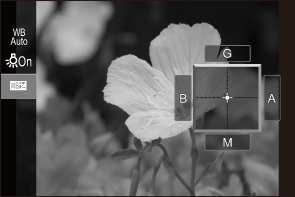
(WB Compensation)Use the front dial or HI to adjust the “amber–blue” axis. Moving the pointer (0) closer to A adds a red cast and moving it closer to B adds a blue cast.
Use the rear dial or FG to adjust the “green–magenta” axis. Moving the pointer (0) closer to G adds a green cast and moving it closer to M adds a magenta cast.
When d (WB Compensation) is done, a mark (*) appears next to the WB mode icon.
Pressing the INFO button in K mode allows you to take a test picture with the current configuration. Press the INFO button again to return to the setting screen.
Press and hold the OK button to reset the adjusted values.
- Fine-tune white balance of all white balance modes at once. g [All d]
Kelvin
(only for Custom WB)You can set the color temperature.
[2000K] – [14000K]
One-touch white balance
Measure white balance by framing a piece of paper or other white object under the lighting that will be used in the final photograph. Use this option to fine-tune white balance when you find it hard to obtain the desired results with white balance compensation or preset white balance options such as A (sunlight) or D (overcast). The camera stores the metered value for quick recall as required.
Put a check (P) for [WB] in [K/n Separate Settings] to store the settings individually for still photography and movie recording.
- Select [H], [I], [J], or [K] (one-touch white balance 1, 2, 3, or 4) on the WB setting screen.
- Select GSet.
Frame a piece of colorless (white or gray) paper in the center of the display.
- Frame the piece of paper so that it fills the display. Ensure that it is free of shadows.
- Press the INFO button.
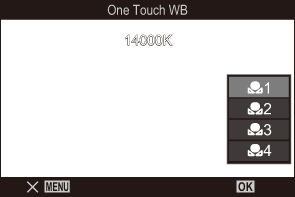
- The one-touch white balance screen appears.
Highlight [Yes] and press the OK button.
- The new value is saved as a preset white balance option.
- The new value is stored until one-touch white balance is measured again. Turning the power off does not erase the data.
Metering with the Button
Assigning [G] to a button allows the control to be used to measure white balance. g “Changing the roles of buttons (Button Settings)”
Frame a piece of colorless (white or gray) paper in the center of the display.
- Frame the piece of paper so that it fills the display. Ensure that it is free of shadows.
Hold the button to which One-Touch White Balance is assigned and press the shutter button all the way down.
- When recording movies, press the one-touch white balance button to proceed to Step 3.
- You will be prompted to choose the one-touch white balance option that will be used to store the new value.
Highlight an option using FG and press the OK button.
- The new value will be saved as the value for the selected setting and the camera will exit to the shooting display.

